Sunday, March 31, 2013

A Screeching Halt

March has been such a successful month for me.  I have finished a number of old WIPS that have been hanging around for years,  I purged my fabric stash again and cleaned out older fabrics for scrap quilts, and worked on some new piecing designs.  My design walls were constantly full and a total of 8 quilts were finished.


But the quilt I was really hoping to get off the design wall was the christmas quilt I started back in January.  I have been slowly cutting it and piecing the blocks between all the other projects.  It is one of those designs you really have to get it all up on a wall before you start sewing the blocks together.


Well, I got it all laid out so I finally decided to start to piece it all together and it quickly came to a screeching halt...

The first color went together perfectly but when I got to the next color.....
Oh crap dear!


It appears I have proceeded to miscut about half of my blocks!  I am hoping I just need to trim off  about 1/4" but I will need to go through and check each one to identify which ones need trimming.


Grrr....Usually this is where a project is bagged up and thrown in the closet.


But I am determined to persevere through this and keep working on it.  I will try and trim a few each evening until I'm sure everything will fit...


The truly frustrating thing is I know exactly what I did.  I cut the blocks over two nights and on one night, I obviously misread my ruler and lined up the fabric to a white line rather than a black.  And the sad part is, when I teach a class using these specialty rulers, I always suggest to my students to mark their rulers with some neon highlighting tape.

That will teach me for not listening to my own advice!


If you haven't seen this product, it is made by Omni-Grid and is called Glow-Line Tape.  It has three rolls to a package in fun neon colors.  The tape is low tack so it doesn't leave a residue on your rulers when you peel it off.  I suggest having some on hand.  If you are a local customer, I have some in stock if you can't find it.  It is a simple thing that can save you so much time....


Thank goodness this quilt is for next christmas so I have another 8 months to work on it!

Sharing this time saving idea with a few linky parties:

Let's Get Acquainted at Pixels to Patchwork
Linky Tuesday at Freemotion by the River
Show and Tell Tuesday at I Have To Say...
WIP Weds at Freshly Pieced

Thursday, March 21, 2013

Texture Quilting

As a longarm quilter, I am always asked if I do a ton of extraordinary quilting on my personal quilts.  And my response is usually "Oh, heck no!".  I answer that way partly because my quilts are usually used to wipe popcorn butter from my hands but mainly because I just really love the look of a simple repeating texture on a quilt.

Thought I would share with you some of my favorites...


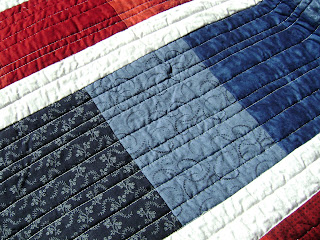
For quilts that are linear either horizontally or vertically, I love straight line quilting.  And spacing the lines at slightly different widths really adds a huge amount of interest.

Even though this quilt was made from my scrap bin, the simple quilting gives it a very contemporary look.  You can see more pictures here.


I also like the look of straight line quilting spiraling into itself.

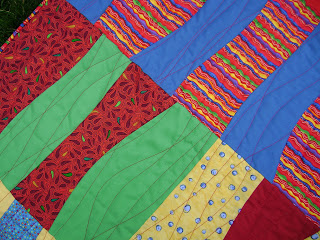
The blocks on this quilt were free form so the straight line quilting created its own pattern that had nothing to do with the block placement.


If the quilt has curved piecing, sometimes simple curved quilting is all you need.  I used a high contrast red thread on this one to add whimsy.

This quilt is one of mine and can be found here for sale.It really needs a home!


Here is a quilt I just finished for a customer where I just spiraled in and slightly rounded the corners.  I quilted rectangles with one going up/down, the next going side to side.  Then each row slightly overlapped.

This quilting has a mid-century modern look to it.  Love it!


Maybe because it is spring, but I have been enjoying quilting in big "messy" flowers across the more modern quilts lately.

This quilt is also one of mine and I made each of these flowers about 8" across.


This piece I quilted for a customer (who has since moved to Canada) and it ended up on the front page of the Modern Quilt Guild website.

The quilt really only needed simple quilting and these loops worked perfectly.


And nothing beats a swirl.  There are so many variations to this quilting...I will have to post a separate thread to show them all.

And I love how this quilting launders.  The quilts get a lovely crinkly look but with the even quilting, there are no saggy areas.


On this quilt I did a mixture of straight line quilting and a double loop texture.

This customer quilt inspired me to make one of these quilts myself.  It is the Ballerina Quilt pattern by Jaybird Quilts.


And for really dense texture, pebbling is fun.


Here is a crazy new pattern I just did for a very happy customer.  I loved how it turned out and will be working on coming up with some additional variations.

I keep thinking I need to make a quilt top just so I can quilt something of my own with this pattern....


What are your favorite quilting patterns or styles?  I would love to hear about them.


And now for a little bit of techy stuff.

With Google Reader going away, I thought I better let you know other places you can find me and stay updated.  I have been trying out Bloglovin' and have been fairly pleased with it.  If you would like to follow me there, you can do so here. Or you can just click the follow button over on the right.

If you like to see examples of my quilting on a very regular basis, I post pictures of my quilting on my Facebook Page so to keep up, you might want to like my page.

And I am on Pinterest if you want to follow what I am exploring there.


I will be joining in on the fun at TGIFF, Really Random Thursday at Live a Colorful Life, Free Motion Quilting Friday.


Thursday, March 14, 2013

Time

As many of you know, I have been slowly reorganizing and cleaning up my sewing room.  Working away in there, I am always loosing track of time so I have been looking for a fun clock to put on the wall.  Not finding what I wanted, I decided to make one.  It was so easy and fun, I decided to share the process with you.


 Here's what you will need...
     1. A clock mechanism
     2. A deep canvas (deep enough for the
             clock mechanism)
     3. Staple Gun
     4. Scrap cotton batting
     5. Sharp Pointed scissors
     6. A fun fabric


I used a 8" square canvas.  I laid fabric over the canvas to select what motif I wanted on the clock face.  I then roughly cut the fabric so it was large enough to wrap around the canvas.  I placed batting between the canvas and the fabric for a softer look.  I started stapling from the center...


Getting the corners right was a little tricky but I ended up with everything all stapled down.  I then trimmed it up closer (the picture to the right is untrimmed).  If you wanted to hot glue some wide ribbon to hide all the rough edges, you definitely could.  As it hangs on the wall, I wasn't worried about it.


I did find it was necessary to place a few layers of batting between the  clock mechanism and the canvas.  Otherwise there is a small gap and the mechanism pulls on the canvas.  I just cut a small X in the batting so the threaded area for the hands could come through.


To make a hole for the clock mechanism to come through, I used some sharp pointed scissors (not my best ones) and carefully made a hole big enough to fit the clock.


It needs to be about 1/4".  Read the instructions on the clock kit you purchase.


Most clock kits come with stick on numbers.  You can choose to use them or not.  I like the look without them...


Here it is hanging in my sewing room.  I love how the clock dial is not centered and the fabric makes a fun face for the clock hands.


I made a second one for my quilting studio out of a piece from Laura Gunn's collection.  I used a much larger rectangular canvas for this one...


Caution - These little clocks are so easy and addictive, you might end up making one for every room.


If you try this and blog about it, please link back here.  I would love to see how yours turn out!

Sharing this idea with a few linky parties:

Let's Get Acquainted at Busy Bee Quilts
Fabric Tuesday at Quilt Story
Show and Tell Tuesday at I Have To Say...
WIP Weds at Freshly Pieced


Sunday, March 10, 2013

Baby Quilts

Last January, I won some fabric from Skye Reve on Fresh Lemon's monthly blog giveaway.  It was so much fun to get these in the mail and think about what I could make from them.


Remember these fabrics I showed you earlier this year?

I had half yard cuts of these five fabrics so I challenged myself to make 2 baby quilts using only these fabrics and some Kona solids I had in my stash.


I drafted up a simple block of 2 squares and 2 rectangles.  For the blocks, I cut everything 2 1/2" wide or into a 6 1/2" square.

For the first quilt, I used 1 1/2" wide white Kona for the sashing and laid four blocks out in this layout.


I also had a light turquoise Kona solid that was just enough to use in a second quilt.  I did the same block but laid them out differently to get this pattern.

Not sure which layout is my favorite.  Do you have one?


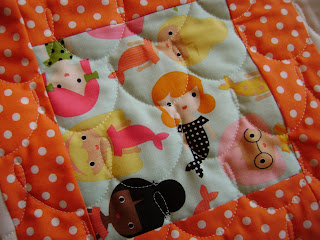
Just as I was about to quilt the first quilt, Don't Call Me Betsy posted a tutorial on what she called a Clamshell Loop.  I thought it looked like little scales and would be perfect with these little mermaids.


Both quilts are now quilted, washed and ready to be loved.  Unfortunately they have no home so I think I will get them posted to my Etsy site.  They would be a great gift for someone's twin little girls.

I will be linking up this week again with Connie at Freemotion by the River, Plum and June at Let's Get Acquainted and Fabric Tuesday over at Quilt Story.  All are great blogs so be sure and check them out.

Thanks for stopping in....

Tuesday, March 5, 2013

A Little Retail Therapy

I haven't bought fabric in quite some time.  But I have been working so hard lately, I decided to reward myself with a little retail therapy!


Okay, so these fabrics aren't really for "fun".  I have an original pattern I want to test and these fun fabrics might just work.  I will share the finished project at a later date.


And these stencils I bought are also for work.  I really needed only one of these but with the high cost of freight, it is worth your while to order more than one.  It is always fun to have new tools to play with.


Some of the real fun starts with collecting some pieces from Carolyn Freidlander's Architextures by Robert Kaufman.  When I was young, I really wanted to be an architect so I am really "drawn" to these.


And this little pile of fabrics is ready to be something.  The prints are designed by Brigitte Heitland for Moda and the solids are Quilter's Linen from Robert Kaufman..

I can't get enough of these Quilter's Linen.  They work themselves into many of my projects.


And then there is always the fabric you buy with no project in mind but you know you just have to have it. Malka Dubrawsky is the designer and Moda is the manufacturer. 

And I am the owner of these two pieces!


So many possibilities with these little purchases.  I hope you keep checking back here or on my facebook page to see what these become in the future.  


I will be sharing my treasures by linking up with Connie on Linky Tuesday, Quilt Story on Fabric Tuesday, WIPS and Whatnot at Quiltsy and WIP Wednesdays at Freshly Pieced. Be sure and visit them for more wonderful quilty stuff.
01 09 10