Friday, August 29, 2014

Scrap-A-Palooza! Quilt #8 Finish

Not being a summer person, I am pretty happy to see the end of August and finally some cooler temperatures.   Soon we will be seeing that wonderful rain and those beautiful fall colors and Oregon can get back to being green! 

The end of August also means we are finishing up the eighth quilt in the Scrap-A-Palooza scrap series! And this month we made a string quilt - my favorite!

Here's a quick review on the previous parts to this quilt.


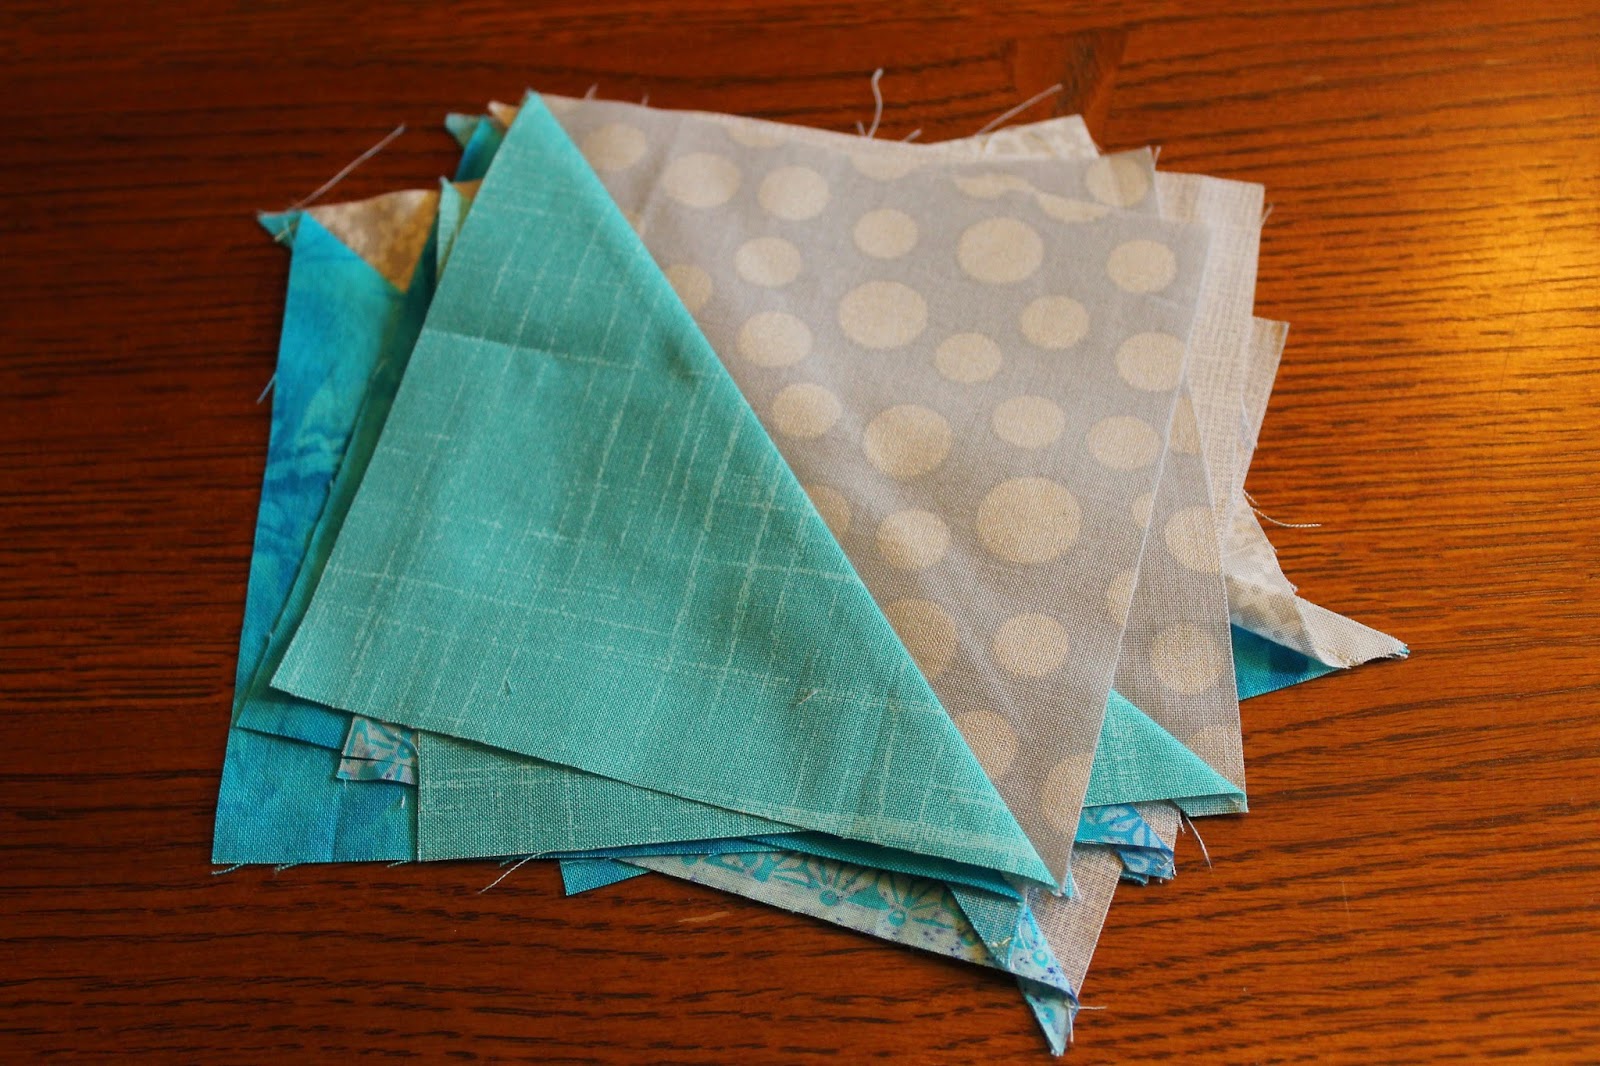
In Part One, I shared how I was starting with my backing fabric to pull the scrap colors for my quilt.  This is a great way for using those large cuts of fabric that don't have a home in your stash.


In Part Two, I shared a tutorial on how to sew up your string blocks.


Last week, the finished blocks went up on the design wall and a layout was chosen.  I decided to break up the pattern with a small border treatment.


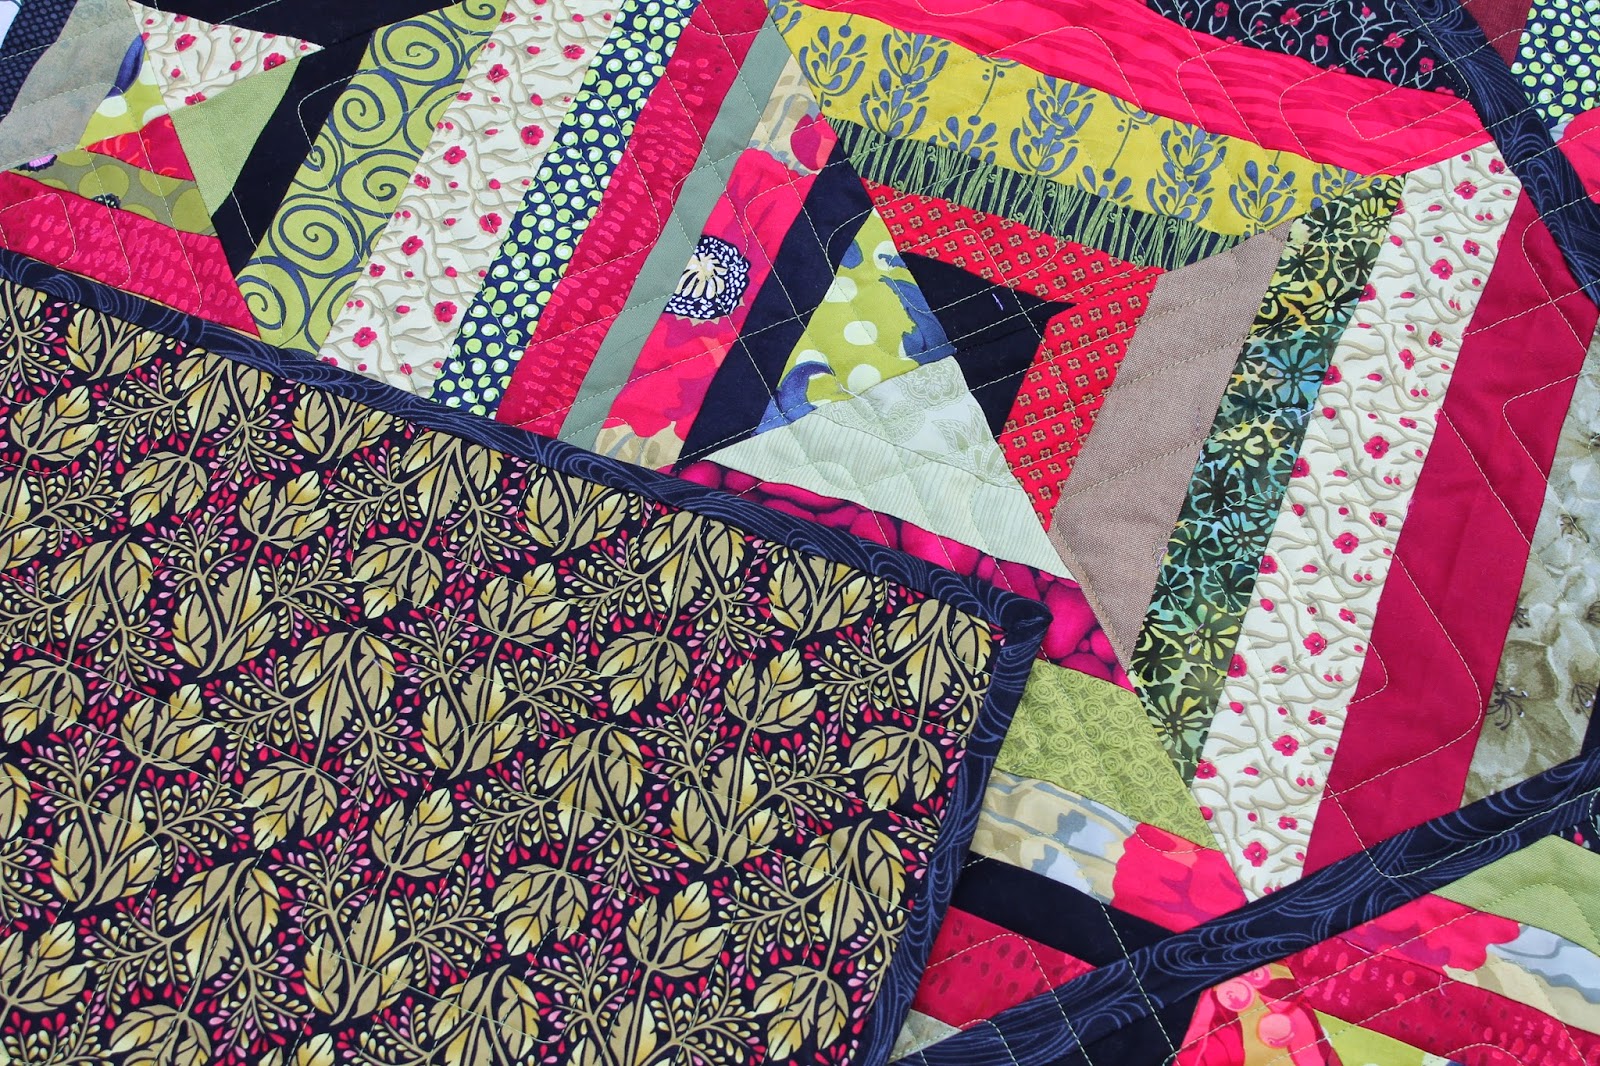
And finally, the finished quilt!  Many of these fabrics are from old projects made years ago so it was fun to remember them as I sewed up the strips.  This quilt pretty much depleted my scraps of that citron green - so happy to see them go!


For the quilting, I did a simple overlapping squared off spiral.


 And because I started with the backing, it looks like I spent a lot of time shopping for the perfect fabric. When actually, I picked up this fabric really inexpensively.  It is always a great day when you can reduce the cost of a scrap quilt.

And now for a few statistics: 

Lap Quilt
Size: 62 x 72"
Fabric: Various colored strings pulled from the scrap bin with approximately 1/4 yard of black for inner border treatment
Total Blocks: 42 - 10" blocks


For September, I will be sewing with 2 1/2" strips.  My storage bin is overflowing so it is time to do something with them! Hope you join me.


Why Scrap-A-Palooza?  Because Quilting is more fun than Housework!

If you are interested in more ways to follow me, you can find me on Facebook, Pinterest, Bloglovin', Feedly, Instagram, Google +, or get my blog sent right to your email inbox by entering your email address on the right sidebar!

 
  If you do join in, don't forget to link your scrap quilt to the 4th annual scrap quilt challenge over at Fabrics N Quilts.

Thursday, August 28, 2014

On the Wild Side

About a year ago, when a friend brought me her granddaughter's quilt to quilt on my longarm, she also gave me a bag of leftover scraps and fabrics from the quilt.  She knows I do a lot of donation quilts and thought I could make something out of it.  At the time I had too many things going on so the project went into a drawer with the intent to work on it "soon".


 Well, "soon" finally came this week and after a bit of digging, I located the bag.  Along with quite a few yards of fabric, there were big stacks of already sewn HSTs.  (Hurray!) The bigger ones were all trimmed up but the tiny ones needed some trimming if I was going to use them.


I decided to throw the bigger blocks up on my design wall to see what I had.  How's that for perfect - there were exactly enough for this layout.  It wasn't quite as big as I was wanting so I decided to trim down the smaller HST's to 1.5".


I used them all and created this fun sawtooth inner border treatment.


 Some of the yardage was then used for an outer border.  Because this quilt came together so quickly, I kept the momentum going and loaded it up on my machine and quickly finished it.


 There was even enough of the gifted yardage for the backing.


 I quilted in a wavy quilt pattern that I thought looked a bit like tiger stripes.  I used a black thread and was really pleased with how the whole project turned out.  I still have quite a bit of fabric left over so there will be another quilt in my future.

100 Quilts for Kids

Thanks to the huge generosity of my friend, I have another quilt ready to be sent off to  Bags of Love as part of the 100 Quilts for Kids event hosted by Quilts in the Queue.


Finish Along 2014


And I am pleased with myself that I made working on this quilt part of my 3rd quarter Finish Along goals (hosted by The Littlest Thistle). It sure feels good to get it finished up!


If you are interested in more ways to follow me, you can find me on Facebook, Pinterest, Bloglovin', Feedly, Instagram, Google +, or get my blog sent right to your email inbox by entering your email address on the right sidebar!

 
the Purge 


Linking up:

Sew Fresh Quilts
My Quilt Infatuation

Monday, August 25, 2014

Sew Kitschy August Block

Ah yes, another weekend with lots of time spent in my sewing room.  And just what did I accomplish?


A single 10" block!

Yep, all those hours went into completing this month's Sew Kitschy block.  I wouldn't say it was difficult (although I did have to re-do a piece or two due to wrong fabric placement).  It was just time consuming sewing up all those tiny pieces.


This completes block number eight.  All that is left is the center square - which I am sure I will need to start as soon as the pattern is available to complete it on time.

The blocks are all hanging in my sewing room so I have been thinking quite a bit lately about how I want to finish it off.  I can't wait to get it finished so I can hang it in my kitchen.


Quiet Play 
You can check out what others have done with their blocks on Quiet Play's blog here.  Not quite as many people sewing along but there are still some really pretty blocks being made.


If you are interested in more ways to follow me, you can find me on Facebook, Pinterest, Bloglovin', Feedly, Instagram, Google +, or get my blog sent right to your email inbox by entering your email address on the right sidebar!


Linking up:

Friday, August 22, 2014

Quilty Flashback Friday

 I have been following Elizabeth's blog Don't Call Me Betsy for many years.  Recently, she has been sharing some of her older quilty archives in a linky party called Quilty Flashback Friday.  I had some time today to dig in the closet and see what my oldest quilt was that I still had in my possession.  
I had completely forgotten about this one!


 This big queen size quilt hasn't seen daylight in years!  I think I made it in about 2002.  It has the really fat batting in it and I tacked stitch the entire thing.


Throughout my quilting journey, I have always loved color.  I don't think I made this with the best quality of fabric but I might have to get it out of the closet and use it this fall.


Here is a shot of the back.


I kinda laughed at the REALLY badly done binding.   
It is good to know I have improved a bit over the years.

Quilty Flashback Friday photo QFF_zps4df0cd76.gif

Linking up:  
 

Tuesday, August 19, 2014

Scrap-A-Palooza! Quilt #8 Part Three

I think some of the best things about string quilts are the endless variations you can can create, the speed at which you can sew up a large number of blocks and the fact that you usually don't have to do a lot of cutting!  This month's Scrap-A-Palooza quilt was no exception.


 Last week I shared a tutorial on how to sew these strings onto a fabric foundation.  Here is my stack of forty two 10.5" blocks trimmed and ready to get up on my design wall.  I was so pleased to see almost all of the scraps I had in these colors get used up.


My original plan was to just sew all the blocks together but once I had them laid out where I could see them, I decided it needed a little something to break up the pattern.


I pulled some black fabric from my stash and added this "hashtag" inner border (I don't know what else to call it!) 

This border treatment works great when you are working with a pieced outside border as its addition doesn't mess up the math and require you to trim any blocks to make them fit around the outside.  I cut these strips at 1.5" so the finished border is quite small at 1" but I think it has a great impact.


I should note, when I sewed the top together, I pressed all my seams open.  With the extra layer of fabric, the seams can get a bit thick.


Here is the finished quilt top outside in the sunshine.  It is really hard to say if it is mostly yellow or green, the lighting really affects the colors on this one.


Here is a bit of a close up on the border.  The black fabric I used has a bit of a gray swirl printed on it.  I am now planning on using this print for the binding to tie it all together nicely.  I also made some time to sew up my backing so the quilt is ready for me to sneak it into the quilting queue.


While I don't yet know how I will quilt this, I will say I usually keep the quilting easy on my string quilts, especially the multi-colored ones.  The quilting just doesn't show up much.  Which also means I sometimes use these quilts to work out a new free-motion quilting pattern.

So I hope you try something slightly outside your comfort zone when you quilt up your string quilt.  They are perfect to practice on!


Here's an overview of the important stuff to do before the next step
  • Decide on a layout
  • Sew up the top
  • Dig in that stash for a backing (it is in there - just keep looking!)
  • Try a new quilting pattern - something out of your comfort zone.


And remember, you can check out all of the previous quilts made in the Scrap-A-Palooza series by checking out the gallery tab. Not only are the steps to each part linked up but I have also shared quilts made by others so you can find lots of inspiration to sew up those scraps.

 
I'll meet you here next week with my finished quilt!

If you are interested in more ways to follow me, you can find me on Facebook, Pinterest, Bloglovin', Feedly, Instagram, Google +, or get my blog sent right to your email inbox by entering your email address on the right sidebar!


the Purge Linking up:

Sunday, August 17, 2014

It all Happened so Quickly!

It all started when I got a little email from Katie at The Littlest Thistle letting me know I had won a gift certificate to the Knotted Thread for an entry in the Q2 Finish-Along for 2014.  Once I completed my little happy dance, I perused the shop...


and picked out this lovely half yard bundle of Simply Style by V & Co.  I fell in love with the colors.


Okay, so maybe this second half yard bundle of Alison Glass' Bike Path Sun Prints also made it into my shopping cart.  I deserve it, right?!?


 They made me so happy when they arrived. Almost too pretty to open!  And then as I was contemplating what to make with them....


I saw a great sale on the newest Kona colors at Gotcha Covered Quilting and had another moment of weakness and bought some one yard pieces.  My cart originally had them all but I managed to whittle them down to just these eight.


Thinking I had gotten my need for new fabric out of my system, my friend and I thought we would drop into a LQS that moved to a new building just to check it out.  And I fell hard for these Mod Geek prints by Robert Kaufman.  But this fabric isn't for me - I NEED it for the graduation quilt I am making my niece.


These additional Arizona prints are for me.  I have admired them on line but when I saw them in person, there was no way I was leaving without them.  So soft and so beautiful!


 But the really funny thing is I allowed myself to buy this giant 16.5" ruler with the agreement that I wouldn't buy any fabric this month.  Silly me...

Really. Should. Know. Better.


If you are interested in more ways to follow me, you can find me on Facebook, Pinterest, Bloglovin', Feedly, Instagram, Google +, or get my blog sent right to your email inbox by entering your email address on the right sidebar! 
Linking up:


Friday, August 15, 2014

With a Little Help from Friends

Recently I got together with a group of women for a sew day.  We meet monthly and I always teach a technique and we make a quilt for charity with the blocks we make.  This month we played with HSTs.

The only information I gave them prior to getting together was to pull a gray and a turquoise from their stash to bring with them to the class.  I chose these two colors purposely because they are always interpreted differently and I wanted to show how beautiful variations in color can be.


Many in the group have made HSTs in the past but none had used or even heard of the Magic 8 method.  With a little marking, sewing and cutting, from two 12" squares, you can have 8 HST units very quickly.  This tutorial on Craftsy does an excellent job explaining it.


I also wanted to bring my Bloc Loc ruler for them to try out and use.  Some liked it immediately, others found it difficult to understand how it worked.  
I think it is a brilliant tool and use it for trimming up all my HSTs.


Above is the quilt that was made with the squares made by the group. 
 I love how it just seems to glow.


 For the quilting. I simply stitched a square spiral in each HST unit and traveled through to the next square.  This made the quilting quick and continuous.  The wonderful texture it gave the quilt was an extra bonus!


A turquoise and gray hexagon fabric from my stash was used for the backing and I bound it with an old piece of turquoise fabric from a bygone project.  The quilt ended up being 40" square.


100 Quilts for Kids 
This sweet little quilt is now added to the growing stack of quilts being donated to Bags of Love as part of the 100 Quilts for Kids event hosted by Heather at Quilts in the Queue.  A big thanks to my friends who helped get this one done so quickly (even though they worried a bit that their fabrics wouldn't all work together!)


If you are interested in more ways to follow me, you can find me on Facebook, Pinterest, Bloglovin', Feedly, Instagram, Google +, or get my blog sent right to your email inbox by entering your email address on the right sidebar!

the Purge Linking up:  

Wednesday, August 13, 2014

Scrap-A-Palooza! Quilt #8 Part Two

  The Scrap-A-Palooza quilt for August is moving along quite nicely! This month we are putting together a string quilt and as shared in part one, I have decided to start with a nice big backing fabric out of my stash and choose the colors for my quilt.


There are a number of tutorials available for making string quilt blocks.  Some quilters use paper, some use temporary glue, and some draw lines on their foundations to align their strips with.  I prefer to use a fabric foundation for my blocks and not mess with glues or marking.  Rather than create another tutorial, I thought I would share this one on Craftsy (no affilitation) that is the same method I use with a few exceptions that I will share.


Here is one of my blocks.  I do not precut the lengths of my strips.  As I am sewing on my strip, once I sew off the foundation, I simply whack cut with a pair of scissors.


I also chain piece a number of blocks at a time.  This saves a lot of time getting up to press.  Last night I did this stack of 16 blocks in about 2 hours.  I spend very little time selecting the scrap I am sewing next.  I just try to get all the colors in a block and not repeat fabrics.

Note:  If you have taken the time to pull your scraps based on the color parameters you have set, theoretically, they should all go together.


I also do not pin or glue my fabrics to the foundation so my strips are not always centered.  I fix this when I trim my blocks by using the 45 degree mark on my ruler and running it down the center strip.  When I trim, I don't worry about the location of the foundation fabric on the back.


Because I cut with both hands, I orient the block like this so I can make all four cuts without picking up the block.


I am cutting my blocks to 10 1/2" square.  I find that a larger block size works well with wider strips, and that is what I have mainly in my scraps. 

Aren't they so pretty when they are trimmed?! 

This pictures also shows my favorite cutter.  I very fond of my big 60mm Olfa cutter.  While that big blade can be daunting, I love it to trim up these string blocks.


This is definitely going to be a very colorful quilt!  And I am so happy to see some of these old scraps get worked into a finished project.


Here's an overview of the important stuff to do before the next step!

  • Determine a desired block size
  • Cut your foundations
  • Sew on your strings
  • Trim your blocks to size


Hope you decide to give string quilts a try.  They are simple, fast and very forgiving!  A great project to use up some of those scraps.

And remember, if you have any questions, don't hesitate to contact me.
Now let's sew up some string blocks!


If you are interested in more ways to follow me, you can find me on Facebook, Pinterest, Bloglovin', Feedly, Instagram, Google +, or get my blog sent right to your email inbox by entering your email address on the right sidebar! 
 
the Purge 


Linking up:

Sew Fresh Quilts
My Quilt Infatuation
Freshly Pieced

01 09 10