Showing posts with label quilt #8. Show all posts

Friday, June 10, 2016

It's a String Thang

I love string quilts!  I don't know what it is about them but they sure make my heart sing.  I love to sew them, I love to touch them and I really like to see how many different configurations I can make with them.  
So today is all about String Quilts!

If you have been following along, you know I have been going back and revisiting some of my past Scrap-A-Palooza quilts.  In August of 2014, I shared how I make my string quilts. Now, today I want to share both some more string quilts I have recently finished along with some made by some of my readers.  
Let's get on with the show!


First up, I have been stepping over a tub filled with brown, taupe and cream strings for about a year.  These are not colors I use very often anymore so I thought they would look great all together in a neutral string quilt.


And here it is all finished up.  I decided to break it up a bit with the narrow brown sashing.  I used the same fabric for the binding so each big square is framed up nicely.


For the quilting, I did a simple square that spiraled in to the center of four blocks.  No marking, I just judged the distance apart by eye.


I knew that I would eventually be making a brown scrap quilt so I picked up this great wood block print backing off a sale rack.  I really like the dark backing with the lighter quilt front.


But I didn't stop at just cleaning out the brown scraps from my sewing room.  I also found a box of leftover red, white and blue fabrics....


...which quickly became another string quilt.
I have actually made an identical quilt about three years ago and have always wanted to make another.


Rather than cut square foundations, I used a 8.5" x 10.5" rectangular foundation.  I really love the elongated diamond it creates.  (Just remember, with rectangles, you do have to make mirror image blocks!)


There was even enough fabric in the box for a backing and striped binding.  I love it when a quilt is made entirely from scraps and stash!

But I am not the only one making Scrap-A-Palooza string quilts.   


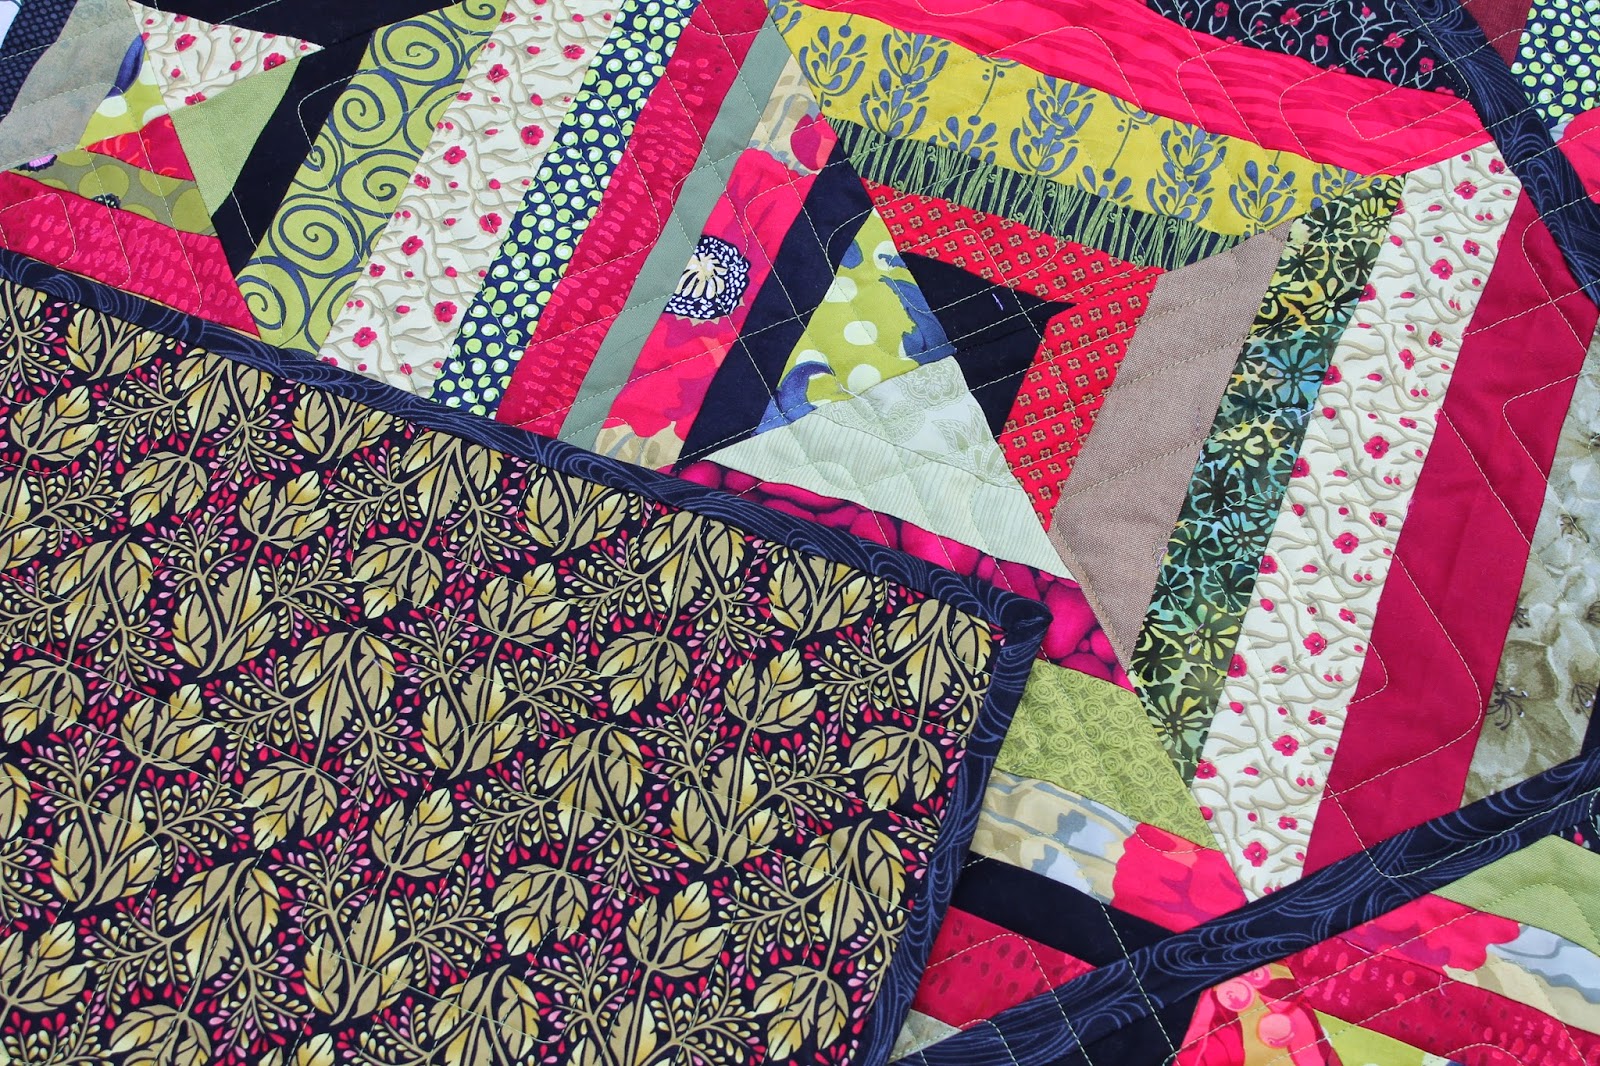
 Here is one a client of mine made.  Each string block is 20".  
I loved her choice of colors and use of negative space.


 And Diann at Little Penguin Quilts had almost the same idea except she made smaller blocks and played with an offset layout.  You can read more about her lovely quilt here.


 If you still want to see a few more string quilts I made a few years ago, you can check out this post.  I have probably made enough string quilts to cover my entire house!  And I am sure there will be many more in my future!

 You can find all of my Scrap-A-Palooza quilts along with links to how they were made in the Quilt Gallery.  If you have scraps, I can help you get them sewn up into quilts!

And remember to share them on Oh Scrap! here every Sunday.
Scraps are my favorite!


Linking Up:

Crazy Mom Quilts (Finish it up Friday)


Sunday, April 24, 2016

Oh Scrap! : It's String Time!

With the exception of one crazy rainstorm (that I liked to think was doves crying), our springtime has been beautiful!  But I am not talking about Spring in this post - I am talkin' about Strings!


For about 6 months now, I have had a plastic tub next to my cutting table where I have been tossing all the neutral colored strings and scrappy bits that I came across.  In it there are lots of browns, tans, creams and grays.  It is almost over-flowing so I think it is time I turned these into a string quilt.

So this weekend, I cut some muslin foundations so I can get started on some string blocks.  I am using the same technique I shared for the Scrap-A-Palooza quilt I made back in August of 2014.

Lots of mindless sewing is in my future!  How about you?


Here are the details for linking up:
  • This linky party is for any scrappy project - It can be in-process or a finished piece.
  • You can link up your blog post (not your homepage please) or Instagram photo from the past week that features your use of scraps.
  • If you are linking to a blog post, I ask that you link back to my blog somewhere in your post. So if you are writing about scraps, just get into the habit of including a link as there will be a linky party available every week!
  • If you are using Instagram, please use the hashtag #ohscrap.
  • This is a party so remember to socialize and comment on the posts of others.
  • Following my blog is not necessary but it sure would be great if you do! 
Quilting is more fun than Housework

So if you love scrappy projects, feel free to grab my button for your sidebar or posts and get ready to share all your wonderful projects from scraps.  And if you have a great idea for using scraps and would like to be featured, feel free to contact me!


Linking Up:

Love Laugh Quilt (Monday Making)
Patchwork Times (Design Wall Monday)
Cooking Up Quilts (Main Crush Mondays)
Em's ScrapBag (Moving it Forward)


Tuesday, March 17, 2015

A Scrap-A-Palooza Mash-Up

A little secret is I kind of pride myself on being able to judge fairly closely how many blocks I can get from a pile of scraps.  And most of the time, I am pretty accurate.  So I was quite surprised recently when my scraps that were supposed to yield me over 50 blocks only made about 36 blocks.  Hhmmm....Not nearly enough for me to make the quilt I had planned!

After I cut the required fabric for my Irish Chain Twist Quilt Along from all of my 1930's scraps, I decided to cut the leftovers into strings and make a baby quilt.  I was going to use the same technique I shared on the Scrap-A-Palooza string quilt.  Now with fewer blocks, I knew I would have to come up with a different layout.


 Then I remembered the layout for the Scrap-A-Palooza Ripple quilt I made.  So I decided to combine the quilts and make a Scrap-A-Palooza mash up!


I used Kona Snow for the solid and decided to add a few Snow strings into the blocks.  
I really like how it looks.


Because I only had 36 blocks, I just kept playing with the layout until I was able to use almost all of the blocks.  I think with this layout using 12 blocks in the center, I had two extra blocks that went into my Orphan Block Suitcase.  I will hopefully find a use for them at a later date.


I was even able to stretch a 1930's print I had with the use of a lavender solid for the backing.  I love it when a bit of creative problem solving results in a sweet finish!


A Quilting Chick 

And as awkward as it can look, I do sew my string blocks as a leader/ender project.  Working on your own leader/ender project? Don't forget to link up with A Quilting Chick this week.


If you are interested in more ways to follow me, you can find me on Craftsy, Facebook, Pinterest, Bloglovin', Feedly, Instagram, Google +, or get my blog sent right to your email inbox by entering your email address on the right sidebar! 
  
Linking up later this week with:

Confessions of a Fabric Addict
Richard and Tanya Quilts

Friday, August 29, 2014

Scrap-A-Palooza! Quilt #8 Finish

Not being a summer person, I am pretty happy to see the end of August and finally some cooler temperatures.   Soon we will be seeing that wonderful rain and those beautiful fall colors and Oregon can get back to being green! 

The end of August also means we are finishing up the eighth quilt in the Scrap-A-Palooza scrap series! And this month we made a string quilt - my favorite!

Here's a quick review on the previous parts to this quilt.


In Part One, I shared how I was starting with my backing fabric to pull the scrap colors for my quilt.  This is a great way for using those large cuts of fabric that don't have a home in your stash.


In Part Two, I shared a tutorial on how to sew up your string blocks.


Last week, the finished blocks went up on the design wall and a layout was chosen.  I decided to break up the pattern with a small border treatment.


And finally, the finished quilt!  Many of these fabrics are from old projects made years ago so it was fun to remember them as I sewed up the strips.  This quilt pretty much depleted my scraps of that citron green - so happy to see them go!


For the quilting, I did a simple overlapping squared off spiral.


 And because I started with the backing, it looks like I spent a lot of time shopping for the perfect fabric. When actually, I picked up this fabric really inexpensively.  It is always a great day when you can reduce the cost of a scrap quilt.

And now for a few statistics: 

Lap Quilt
Size: 62 x 72"
Fabric: Various colored strings pulled from the scrap bin with approximately 1/4 yard of black for inner border treatment
Total Blocks: 42 - 10" blocks


For September, I will be sewing with 2 1/2" strips.  My storage bin is overflowing so it is time to do something with them! Hope you join me.


Why Scrap-A-Palooza?  Because Quilting is more fun than Housework!

If you are interested in more ways to follow me, you can find me on Facebook, Pinterest, Bloglovin', Feedly, Instagram, Google +, or get my blog sent right to your email inbox by entering your email address on the right sidebar!

 
  If you do join in, don't forget to link your scrap quilt to the 4th annual scrap quilt challenge over at Fabrics N Quilts.

Tuesday, August 19, 2014

Scrap-A-Palooza! Quilt #8 Part Three

I think some of the best things about string quilts are the endless variations you can can create, the speed at which you can sew up a large number of blocks and the fact that you usually don't have to do a lot of cutting!  This month's Scrap-A-Palooza quilt was no exception.


 Last week I shared a tutorial on how to sew these strings onto a fabric foundation.  Here is my stack of forty two 10.5" blocks trimmed and ready to get up on my design wall.  I was so pleased to see almost all of the scraps I had in these colors get used up.


My original plan was to just sew all the blocks together but once I had them laid out where I could see them, I decided it needed a little something to break up the pattern.


I pulled some black fabric from my stash and added this "hashtag" inner border (I don't know what else to call it!) 

This border treatment works great when you are working with a pieced outside border as its addition doesn't mess up the math and require you to trim any blocks to make them fit around the outside.  I cut these strips at 1.5" so the finished border is quite small at 1" but I think it has a great impact.


I should note, when I sewed the top together, I pressed all my seams open.  With the extra layer of fabric, the seams can get a bit thick.


Here is the finished quilt top outside in the sunshine.  It is really hard to say if it is mostly yellow or green, the lighting really affects the colors on this one.


Here is a bit of a close up on the border.  The black fabric I used has a bit of a gray swirl printed on it.  I am now planning on using this print for the binding to tie it all together nicely.  I also made some time to sew up my backing so the quilt is ready for me to sneak it into the quilting queue.


While I don't yet know how I will quilt this, I will say I usually keep the quilting easy on my string quilts, especially the multi-colored ones.  The quilting just doesn't show up much.  Which also means I sometimes use these quilts to work out a new free-motion quilting pattern.

So I hope you try something slightly outside your comfort zone when you quilt up your string quilt.  They are perfect to practice on!


Here's an overview of the important stuff to do before the next step
  • Decide on a layout
  • Sew up the top
  • Dig in that stash for a backing (it is in there - just keep looking!)
  • Try a new quilting pattern - something out of your comfort zone.


And remember, you can check out all of the previous quilts made in the Scrap-A-Palooza series by checking out the gallery tab. Not only are the steps to each part linked up but I have also shared quilts made by others so you can find lots of inspiration to sew up those scraps.

 
I'll meet you here next week with my finished quilt!

If you are interested in more ways to follow me, you can find me on Facebook, Pinterest, Bloglovin', Feedly, Instagram, Google +, or get my blog sent right to your email inbox by entering your email address on the right sidebar!


the Purge Linking up:

Wednesday, August 13, 2014

Scrap-A-Palooza! Quilt #8 Part Two

  The Scrap-A-Palooza quilt for August is moving along quite nicely! This month we are putting together a string quilt and as shared in part one, I have decided to start with a nice big backing fabric out of my stash and choose the colors for my quilt.


There are a number of tutorials available for making string quilt blocks.  Some quilters use paper, some use temporary glue, and some draw lines on their foundations to align their strips with.  I prefer to use a fabric foundation for my blocks and not mess with glues or marking.  Rather than create another tutorial, I thought I would share this one on Craftsy (no affilitation) that is the same method I use with a few exceptions that I will share.


Here is one of my blocks.  I do not precut the lengths of my strips.  As I am sewing on my strip, once I sew off the foundation, I simply whack cut with a pair of scissors.


I also chain piece a number of blocks at a time.  This saves a lot of time getting up to press.  Last night I did this stack of 16 blocks in about 2 hours.  I spend very little time selecting the scrap I am sewing next.  I just try to get all the colors in a block and not repeat fabrics.

Note:  If you have taken the time to pull your scraps based on the color parameters you have set, theoretically, they should all go together.


I also do not pin or glue my fabrics to the foundation so my strips are not always centered.  I fix this when I trim my blocks by using the 45 degree mark on my ruler and running it down the center strip.  When I trim, I don't worry about the location of the foundation fabric on the back.


Because I cut with both hands, I orient the block like this so I can make all four cuts without picking up the block.


I am cutting my blocks to 10 1/2" square.  I find that a larger block size works well with wider strips, and that is what I have mainly in my scraps. 

Aren't they so pretty when they are trimmed?! 

This pictures also shows my favorite cutter.  I very fond of my big 60mm Olfa cutter.  While that big blade can be daunting, I love it to trim up these string blocks.


This is definitely going to be a very colorful quilt!  And I am so happy to see some of these old scraps get worked into a finished project.


Here's an overview of the important stuff to do before the next step!

  • Determine a desired block size
  • Cut your foundations
  • Sew on your strings
  • Trim your blocks to size


Hope you decide to give string quilts a try.  They are simple, fast and very forgiving!  A great project to use up some of those scraps.

And remember, if you have any questions, don't hesitate to contact me.
Now let's sew up some string blocks!


If you are interested in more ways to follow me, you can find me on Facebook, Pinterest, Bloglovin', Feedly, Instagram, Google +, or get my blog sent right to your email inbox by entering your email address on the right sidebar! 
 
the Purge 


Linking up:

Sew Fresh Quilts
My Quilt Infatuation
Freshly Pieced

01 09 10