Showing posts with label bucket list quilts. Show all posts

Tuesday, March 29, 2016

Something old into something new!

I have been wanting to make a scrappy medallion quilt for a number of years now.  As I was doing a bit of project organization, I got to thinking that I could probably combine a few WIPs and start putting one together.

With just one quilt, I can cross another bucket list quilt off the lineup and finish two WIPs!


 Remember these pretty  Basket Weave Star blocks I was paper piecing?


I thought they paired nicely with some needle turned applique blocks I made about a decade ago.  
(I think it is time to admit I will not be turning them into the queen size quilt I had originally planned.)

Maybe use the applique as the center medallion?


 Or I can use the Basket Weave Stars in the center and use the floral blocks as one of the outside borders.  Hmm....

I think I will leave them up on my design wall for a bit and see what happens.
But a medallion quilt will be the next project off my quilty bucket list.  Once I decide where I am starting, I will start sharing my progress!


Linking Up:


***This post contains affiliate links. If you click through and make a purchase, at no additional cost to you, I may make a small commission, which I appreciate so much!***

Friday, February 26, 2016

Ta Da! Park Bench Quilt Finish

I am letting you know right now that this is a picture laden post!  

But having spent a year piecing the blocks, MANY back-breaking long days standing at my longarm and a few late nights hand sewing the binding so I could write about the finish today, you can bet I am going to share every square inch of this quilt with you!

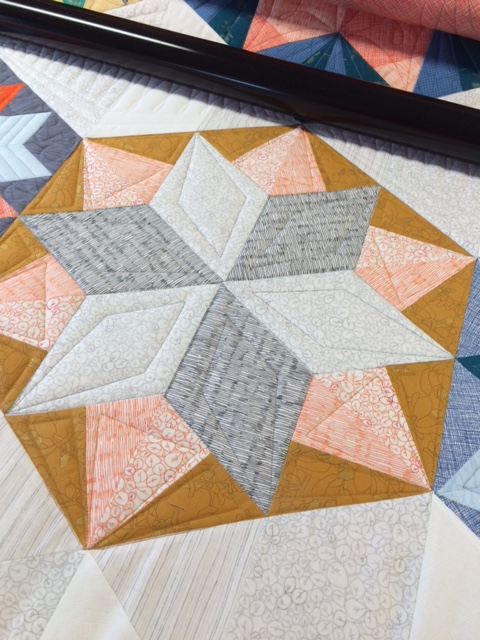
As soon as I saw Julie's (Jaybird Quilts) Park Bench quilt, it went right onto my Bucket List of quilts.   I love big bold blocks and this is one showy pattern!


By chance, I spied the kit on Craftsy for a really ridiculous price and instantly purchased it.  I think Julie did such a perfect job putting together this quilt, I just couldn't see how I could make it any better so I made it just like hers.

(Unfortunately, the kit is no longer available but Craftsy does have Julie's Gravity quilt kit and the rulers - which are brilliant by the way!)


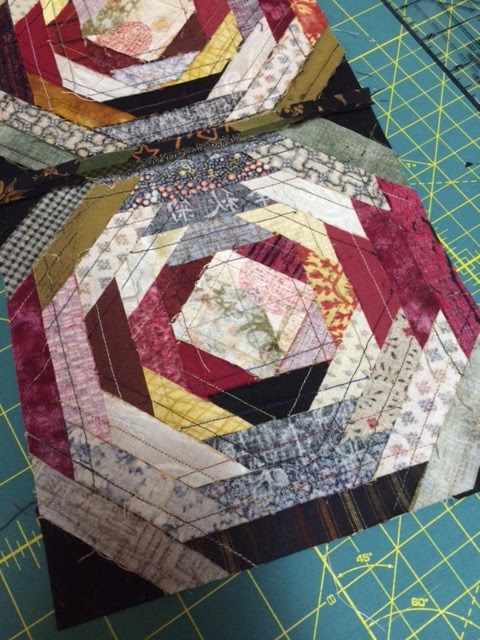
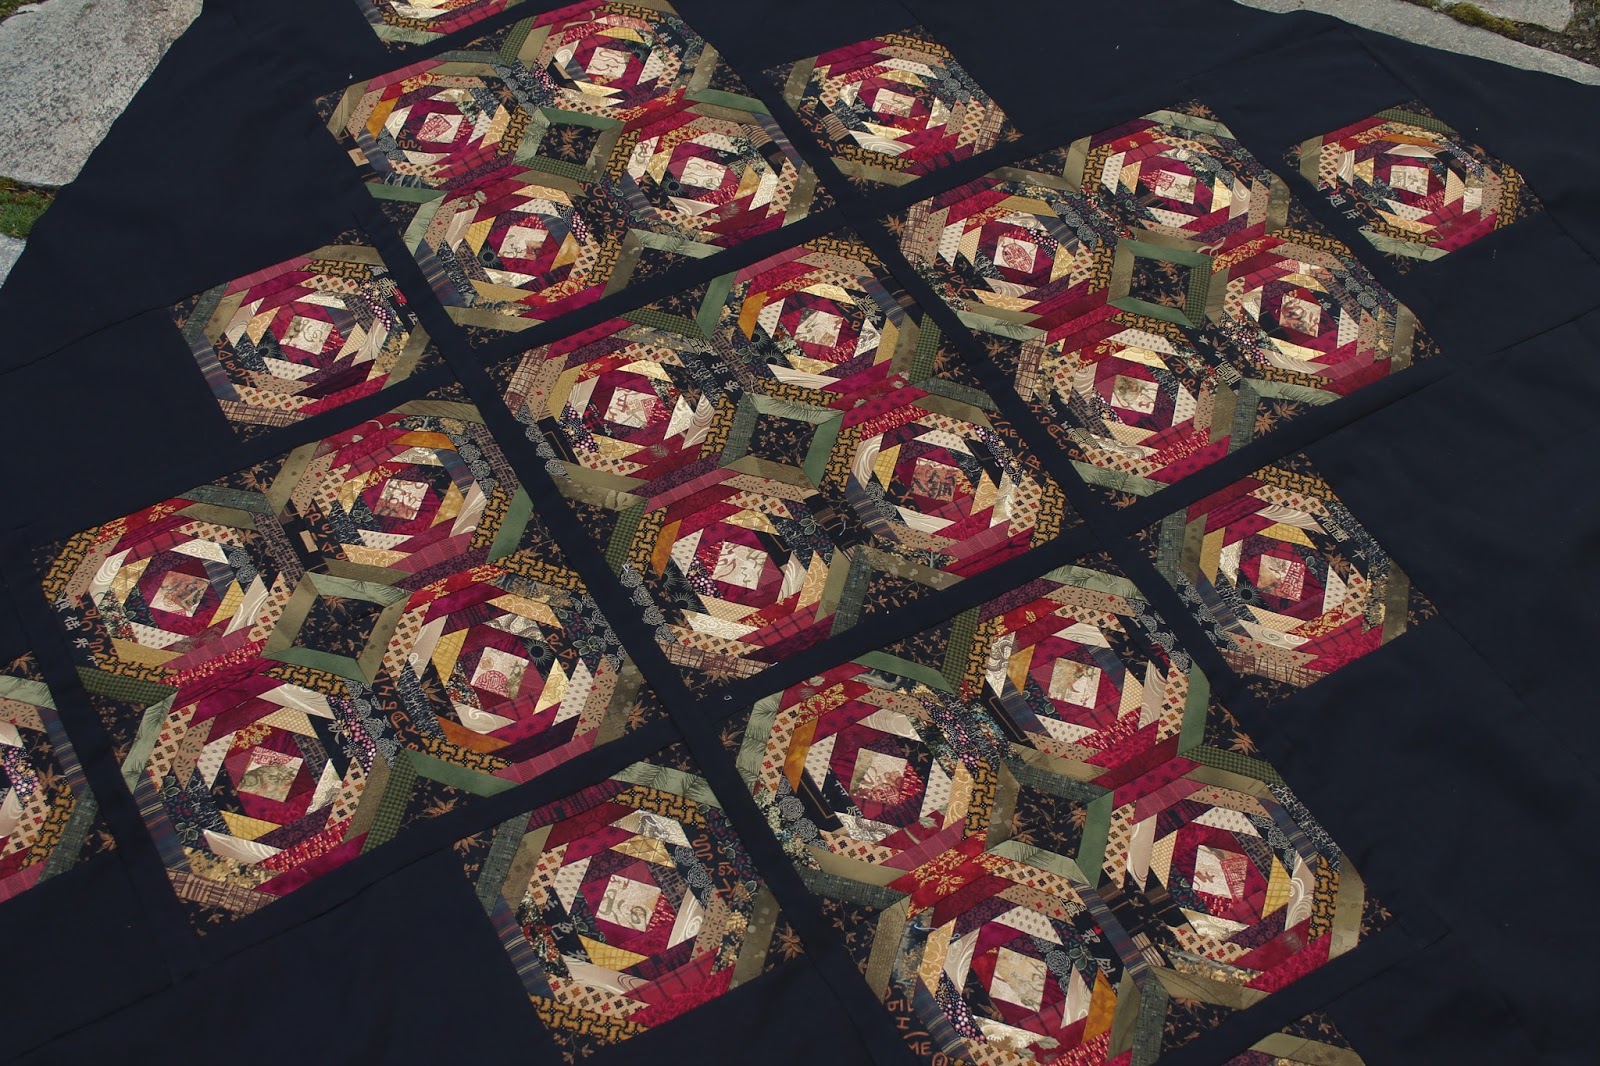
I spent almost all of 2015 sewing up the hexagon blocks.  My goal was to sew up about two blocks a month.  That would leave me plenty of time tin the year to finish up the pieced background for the quilt top.


I finished up the flimsy around the end of January - right on schedule!


I had been reserving a large chunk of time in my February schedule to squeeze in this quilt between my client quilts.  I wanted to give it the custom quilt job it deserved.

Prior to quilting, I did re-watch Angela Walters Craftsy class Dot to Dot Quilting.  If you want to try some of the quilting seen on my quilt, she does a great job walking you through the process. 
This border was totally inspired by the class.


My goal on the quilting was to quilt each element differently.  I may have repeated designs but made slight changes so I could create a different look.  I also didn't want the quilting to be too dense.  While it is dense in a few areas, overall I wanted a cuddly quilt.


I loaded the quilt sideways on my frame and quilted an entire column of hexagons before moving the quilt.  I did use 5 different colors of thread on this quilt so there were a fair number of thread changes.


This first block in the middle column is one of my favorites.


This orange and blue one makes me smile too.  I started quilting the orange diamonds and decided I didn't like how I quilted the first one so I made a slight change on the rest.  Unlike a client quilt, I don't have to pick out that first diamond.  :)


And here are the last two blocks on the middle column.


If you were ever wondering what the view is like from underneath a longarm here you go.  After a long day of quilting, I wasn't sure I was going to be able to get back up off the floor.  
It was a good thing I had my phone!


Starting on the third and final column of blocks.  


I am still meeting my goal of coming up with unique designs.


I like this block too.  Simple designs are sometimes the best!


 Just the final border to go!


And here it is - Fresh off the Frame!


Here is a picture of the back.  I have to admit it looks pretty cool.  Sometimes, I do piece my backing to use up fabrics but for custom quilting, I suggest just a single fabric so you can see the detail.  I used an orange crosshatch fabric for mine.  Enough pattern to hide the areas I back stitched but simple enough to let the quilting shine. 


 I will definitely be snuggling with this one tonight!


 Thanks for reading through to the end!


2016 FAL


This finish was one of my first quarter goals for the 2016 Finish A Long.  I still have two more to get through!


Linking Up:

Crazy Mom Quilts (Finish it up Friday)
A Quilted Passion 
Sew can she
 A Quilter's Table (2016 FAL)


***This post contains affiliate links. If you click through and make a purchase, at no additional cost to you, I may make a small commission, which I appreciate so much!***

Wednesday, November 25, 2015

Yo Yo Quilt

I have been needing to do a bit of repair on a quilt I finished years ago and I was finally motivated to get it done thanks to Val.  Every Tuesday over at Val's Quilting Studio, you can share posts based on a pre-determined theme - this week is Yo Yo Quilts so the timing to get these repairs done was perfect.


I made this quilt a little over 10 years ago. When my grandmother passed, I found a few bags of fabric scraps in her belongings and decided to use some of them in a yo yo quilt.  I decided to use different colors to create a pattern. And I really love the points around the outside border.


The quilt hangs over the foot board of my lodge pole pine bed as it is a bit delicate. About every two years, I need to fix a few of the yo yos or restitch a few of the connecting stitches.  I have always loved seeing vintage yo yo quilts and really wanted one of my own. I do love seeing it every day but if asked to make another one, I am sure I can come up with a number of excuses as to why that is not happening!

I hope all of you in the US have a wonderful Thanksgiving filled with friends, family and good food. 

Craftsy
 
And if you are a Black Friday shopper and love good deals, I should let you know about some great ones on Craftsy.  They have all of their classes on sale.  And right now I am not sure you can beat their pricing on Kona Solids and Aurifil threads.  This is a great time to load up on those necessary basics!

I myself am picking up a few more quilt kits and quilt backs at ridiculously low prices!


Linking Up:


This post contains affiliate links. If you click through and make a purchase, at no additional cost to you, I may make a small commission, which I appreciate so much!

Monday, October 26, 2015

Blogger's Quilt Festival - Fall 2015 Scrappy Pineapple

Every spring and fall, Amy Ellis of Amy's Creative Side holds one of my favorite events - the Blogger's Quilt Festival.  This event coincides with Quilt Market and is a way for those of us who didn't get a chance to go, to enjoy a virtual quilt show.  I am always so inspired by all the beautiful quilts and their creative makers. It is a great time to discover new blogs and quilters.

One of the quilts I am entering this fall is my Scrappy Pineapple Quilt.
(You can read the original post here.)


An intricate Pineapple quilt has been on my bucket list since I started quilting. I had started piecing these blocks many years ago and finally finished this quilt late spring.  I was heavily inspired by some of my Pendleton blankets that I love so much.


I wanted this quilt to also test my skill as a piecer.  Each block was meticulously pieced - I wanted to see precision without paper piecing the blocks.


I chose scraps in reds, blacks, greens and tans.  I wanted this quilt to have a lot of warmth to the colors.


 When it came to laying out the blocks, I wanted to come up with something unique.  For weeks, the blocks were moved around my design wall until I had a layout I liked.  Then it was just a matter of a lot of math and background cutting.


 And I was so pleased with the results! 
 I love to see traditional quilt blocks laid out in fun and new ways.   


For the quilting, I went with stacked swirls in the background and ditch work in the blocks.  I also echo quilted in the black sashing to accentuate the layout design. 


 A red and tan print on the back to finish it off nicely.


 I am entering this quilt in the scrappy quilts category. I love all the tiny pieces and the way the colors all work together to create some beautiful patterns and illusions.


Thanks to Amy for hosting this event.  It must be an immense amount of work!

I hope you grab a cuppa and take some time to visit all the bloggers who have entered the show.  Then you can nominate your favorites for Viewer's Choice before the 29th..  Voting for all the categories opens on the 30th.


 If you are interested in seeing more of my quilts, here are my other entries over the years:

Fall 2013: Star Surround

Spring 2014: Appliqued Flowers
Spring 2014: Geese Migration

Fall 2014: Wiggle Time
Fall 2014: Vertical Scraps
 
Spring 2015: Rainbow 9 Patch
Spring 2015: Life is a Highway

Quilting is more fun than Housework
If this is your first visit to my blog - Welcome!  My quilting roots are in the traditional but I am all over the place in my quilts.  I love to play with color in all manor of quilting techniques - paper piecing, EPP, applique.  I share my processes for using scraps in my Scrap-A-Palooza series and I host a link party every Sunday called Oh Scrap! I hope you choose to follow along to see what I am up to next!

Quilting is more fun than Housework...

Linking Up:


01 09 10