Thursday, February 27, 2014

Scrap-A-Palooza! Quilt #2 Finish (Part 4)

Did February just fly by for you also?  With it being a short month, keeping up with this month's scrap quilt has been a little difficult for some but there are others who are working diligently on their scraps bins and I will continue to share everyone's progress!


But in this post, we are taking a look at the finished  Quilt #2.  At this step, the quilt should be quilted and bound and ready to share!  If this is a quilt you would like to try, you can find all the links in the Scrap-A-Palooza quilt gallery tab above.


In Part One, we narrowed our colorways and pulled our scraps.


We also cut our scraps to size. 

I really enjoyed playing with these two colors.  So spring-like!


Part Two had us getting our squares up on our design walls and finalizing a layout.


We also determined what fabric to use as sashing.


Last week in Part Three, we added measured, pinned and sewed in the sashing.  We also talked about some possible quilting ideas.


And just how did I quilt mine? 


I decided to quilt a fun ruffled swirl in a cream colored thread as an allover pattern on my quilt.  I thought it worked well with the soft colors in the quilt.


Spring is arriving and we finally got some nice weather so I was able to snap some outdoor photos.


Pictures here in the gray northwest can be quite challenging sometimes!


And remember me saying you could also use your 2 1/2" squares for this project?  With the scraps left over from the quilt above, I sewed up these 4 patches....


...and made this adorable little baby quilt using the same process.


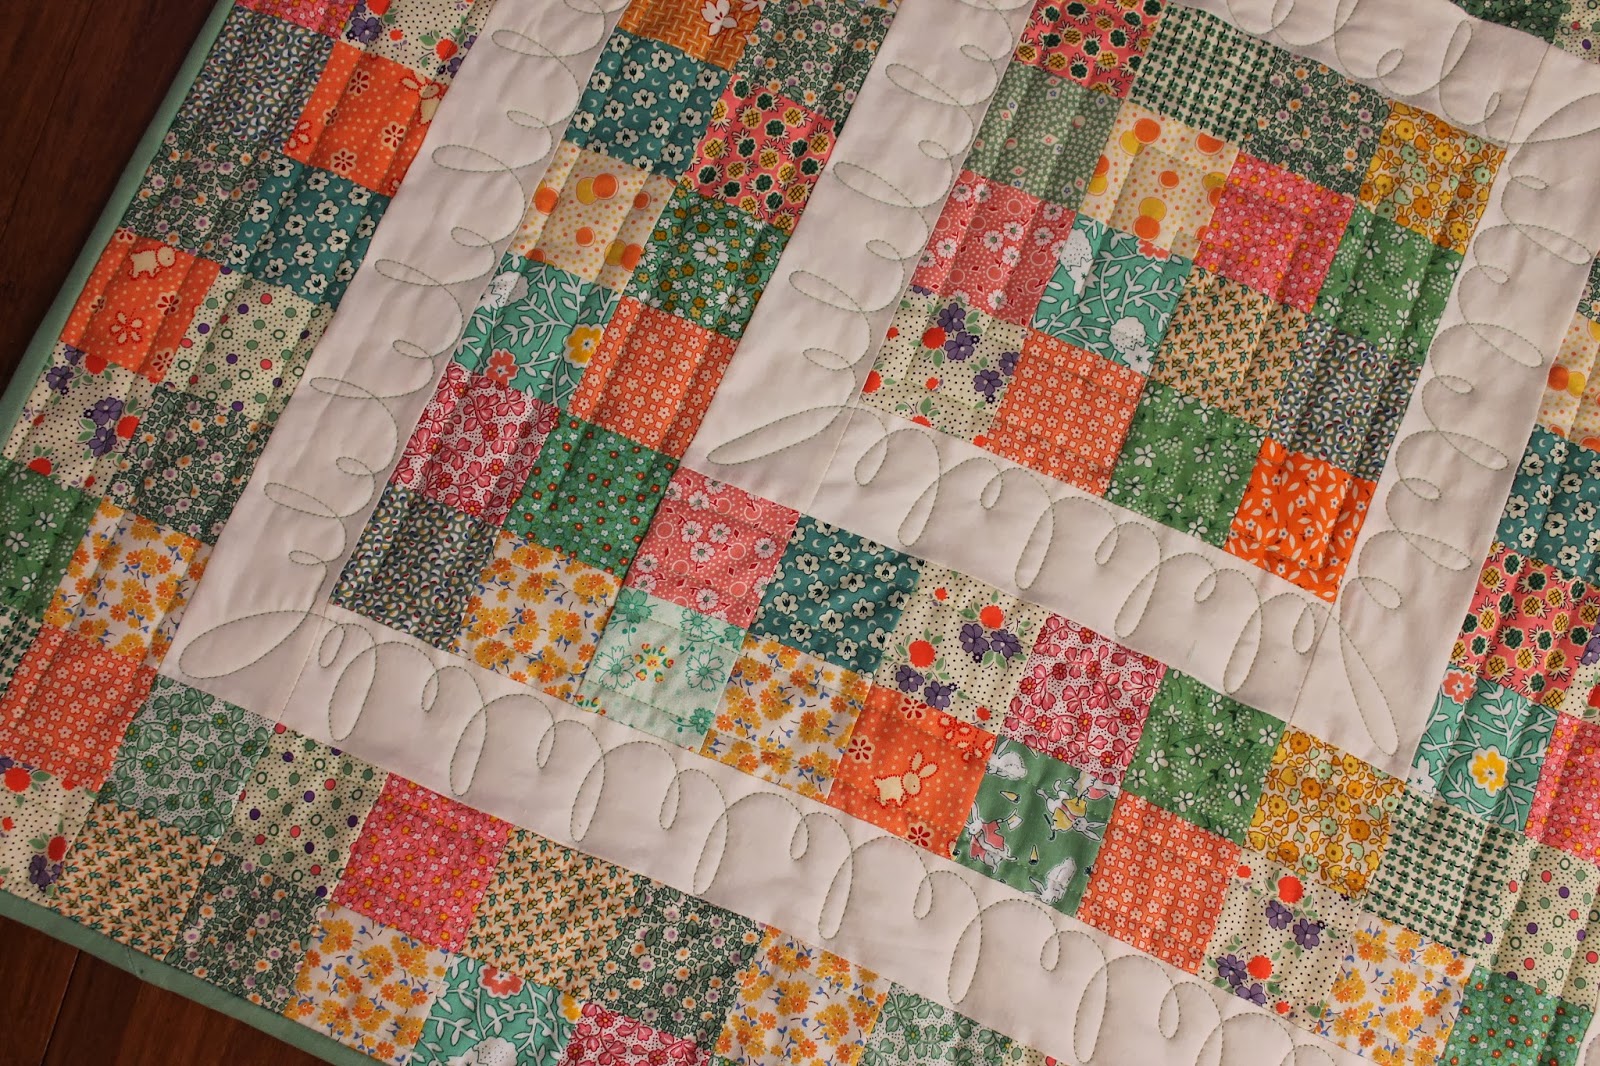
For the quilting on this, I simply did some straight line quilting in the prints and some "e's and l's" in the sashing.


The quilt is not that big but it is sure big on sweetness!


And now for a few statistics:

Small Lap Quilt
Size: 44 x 56"
Fabric: 30's reproduction scraps in oranges and greens as Inspiration.  Partial fat quarters were used for this project.
Total Pieces: 112 4.5"squares
Sashing Fabric Used: approx 1 yard

Small Baby Quilt
Size: 32 x 32"
Fabric: Made with scraps from quilt above.
Total Pieces: 48 4-patches made from 2.5" squares
Sashing Fabric Used: Not a lot

 And some other photos to share using this pattern:


Alycia at Alycia's Quilts has started this quilt from some 4.5" squares she received from a friend.  


She also shared this quilt she had made years earlier which was made from strips.  The style is certainly the same!


I have lots of finished quilts made by others from the first quilt in this series to share with you.  I will do that soon in a separate post.  If you are sewing along, I would love to see what you create with your scraps!


Curious what Quilt #3 will be?  You will have to wait until the first week of March to find out!  I will tell you that it will be bright, modern and uses strips.  Hope you stay tuned.

Why Scrap-A-Palooza?  Because Quilting is more fun than Housework!


http://www.bloglovin.com/blog/5198185

Linking up with Pretty Bobbins, TGIFF, Richard and Tanya Quilts, Crazy Mom Quilts,  Scrap Basket Sunday and Confessions of a Fabric Addict.

FairyFace Designs

If you are sewing along, don't forget to link your Scrap-A-Palooza quilt over at FairyFace Designs for Sarah's Put Your Scraps To Work series.

Wednesday, February 26, 2014

Some Scrap Busting


Every once in a while, I find myself with a large amount of scraps in a specific colors.  The fastest and easiest way of busting these scraps that I have found is to sew up a single color string quilt.


One of the great things about these monochromatic quilts is you can really hide some really old scraps!


To make the sewing as mindless as possible, I do sew the strips onto a fabric foundation.  I can then just sew on the strips using the Leaders/Enders method as I work on other projects.


And before you know it, the scrap bin is empty and you have yourself a twin size quilt!


I even had a backing on hand that worked perfectly.


So this makes finish number six so far for 2014!  I had included this quilt as part of my goals for both the 2014 Finish-A-Long with Katie over at The Littlest Thistle and the 2014 UFO and NewFO project over at Joanie's Trendy Quilts.  Let the finishing trend continue!

http://www.bloglovin.com/blog/5198185

I will be sharing this with the following linky parties. Needle and Thread Thursday at My Quilt Infatuation and Really Random Thursday at Live A Colorful Life, Let's Bee Social at Sew Fresh Quilts, and WIP Wednesday with Freshly Pieced.  Be sure and check out these blogs for even more quilty inspiration.
Finish Along 2014Joanie’s Trendy Quilts
February Finishes

Sunday, February 23, 2014

Seeing Stars - QAL

Even with all the projects I have going on around here, I'm delighted to say I have been keeping up with each week's assignment for the Star Light Star Bright Quilt Along at Happy Quilting.  This week was the simple task of assembling up our star centers.  As I am only making 4 giant stars, in no time at all, I was finished.


 At this stage, I can really see this quilt starting to come together.  I love the bold colors and the simplicity of only using these four prints throughout the quilt.


Once I start a quilt, I keep an eye out for a good deal on the backing fabric.  I was ecstatic that I was able to pick up the red and green circle fabric from Fort Worth Fabrics.  Not only was it on sale but they were temporarily discounting their sale items by an additional 20%. WooHoo!  To celebrate, I might have even threw a few other items in my shopping cart.


http://happyquiltingmelissa.blogspot.com/p/quilt-longs.html

Want to see what fabrics other are using for this Quilt-A-Long?  You can check out everyone's links here.


http://www.bloglovin.com/blog/5198185
I will be sharing this Anything Goes Mondays at Stitch by Stitch, Design Wall Monday at Patchwork Times and Linky Tuesday at Freemotion by the River.
 

Friday, February 21, 2014

February's ALYOF Goal - Acheived!

And the finishes just keep on coming!

As part of my attempt to finish up a number of these unfinished projects around here, I have been motivating myself by signing up with a number of Finish-A-Long programs.  I am finding this is really helping me stay focused.  


At the beginning of February, I set a goal hoping that I would quilt up this top that has been waiting in the quilting queue for about 7 years.


I am happy to say, it is now quilted and bound and ready to bring brightness to a wintry evening!


I pieced the backing together with the leftover fabrics from the top.  The quilting really shows up nicely in the back fabrics!


ALYoF2014

While I am participating in a number of Finish-A-Longs, I set the goal of finishing this quilt as part of Sew Bittersweet Designs A Lovely Year of Finishes.

That is now two months in a row I have achieved my goal!  Hurray!!


http://www.bloglovin.com/blog/5198185
Linking up with Finish it up Friday at Crazy Mom Quilts, Confessions of a Fabric Addict for Can I get a Whoop Whoop Friday, TGIFF, Fabric Frenzy Friday at Forth Worth Fabric Studio, Link a Finish Friday at Richard and Tonya Quilts, Sew Bittersweet Designs A Lovely Year of Finishes and Show it off Saturday at Sew Can She.
 
February Finishes


Thursday, February 20, 2014

Scrap-A-Palooza! Quilt #2 Part Three

When I looked at the calendar today, I couldn't believe that we're past the midpoint of February and quickly heading towards the end of the month! I've been feeling so productive lately but I still have a lot of things to finish up before the end of the month!  Guess I had better pick up the pace and turn off the Olympics for a few days.  Bummer.


Last week's assignment for the second quilt in our Scrap-A-Palooza series was to finish cutting up the squares, determine a size and lay the quilt out on the design wall.


This week we will start sewing and hopefully get this quilt top finished up.


As I said last week, this quilt starts with a pieced center. A rectangle like the one shown below will give you a rectangular quilt.  If you start with a square, your finished piece will also be square.


To start sewing the top, you begin by piecing up the center.  For my quilt, I went with a 2 by 5 block center.

The next step is to cut the sashing strips.  To determine the proper width for your sashing, take the cut size of your squares, subtract 1/2" (seam allowance), then divide by 2.  You will then need to add back in the 1/2" seam allowance.


For my quilt with 4.5" squares, my sashing is 2.5" wide.


I have learned from experience that it is a good idea to cut your sashing to length.  While it might seem like you can just sew the strips to the pieced center and trim, I find you get better results taking the time and cutting the strips.  As I am working with 4.5" squares, I know my finished size is 4".  So this means for the first ripple, my vertical strips are 20.5"  (Remember you need to add in that seam allowance.)  You can also use your cutting mat or a tape measure if you prefer that over the math.

Sew these strips onto the sides of your pieced center.  I pressed toward the sashing so I didn't have to press against all those seams.


The next step is to cut and sew the top and bottom sashings.  As the width of the sashing is half of a square, the two sashings sewn to the center will equal the width of one of your square.


For my quilt, I need a length of 12.5".  (or the equivalent of 3 squares)
 

The next step is to piece the squares for another "ripple".  For the sides, you will add one more square than the center.  If you cut your sashing width correctly, these will fit perfectly onto the sides.


Note:  I do take the time to add a couple of pins before I sew.


For the top and bottom, you will piece enough squares to fit across the top.  To get this number, add 3 blocks to the number of blocks you used in your center.


Once again, I pressed my seams toward the sashing.


Continue in this same method with enough "ripples" to get the size quilt you want.  I used my ironing board to pin the sashing strips to ensure they kept the quilt squared up.


After you sew the sides, continue by sewing the sashings to the top and bottom.


Before you know it, you will have a quilt top finished!  You can end your quilt with a pieced row or a sashing.


I ran out of the cream muslin at this point so mine is ending with prints around the edge.  
That is usually how I roll!


While I don't often heavily piece a backing, I decided to use up more of these fabrics for the back. 


Happily, all of these fabrics came from my stash.


In fact, as I cut the squares for the above top, I went ahead and trimmed up the scraps into 2.5" squares.  From them, I was also able to sew up this fun baby quilt using the same method.


In part three of each quilt, I always like to share some quilting ideas.  Amanda Jean at Crazy Mom Quilts, recently wrote a great tutorial on a spiral or oval quilting motif.  This would work perfectly on this quilt and can be done with a walking foot.


If you are wanting to try a little FMQing, a simple swirl would also work great.  Remember when swirling, the direction you start your "swirl" in is the direction you will be moving along on your quilt.  Keeping this in mind will help insure you don't quilt yourself into a corner.


Here's an overview of the important stuff to do before the next step!

  • Sew your pieced center
  • Cut and sew your sashing to the center
  • Continue adding "ripples" of pieced blocks and sashing until you reach the desired size of your quilt
  • Remember to pin each ripple to keep the quilt squared up.
  • Finish up the top and determine a backing!

I am still seeing some finishes on Scrap-A-Palooza Quilt #1.  I will share some photos soon so you can see what others are doing.  If you are joining in, I would love to feature your quilt so be sure and contact me soon.
 
See you next week with my finished quilts!


http://www.bloglovin.com/blog/5198185

I will be sharing this with the following linky parties. Needle and Thread Thursday at My Quilt Infatuation and Really Random Thursday at Live A Colorful Life, Let's Bee Social at Sew Fresh Quilts, and WIP Wednesday with Freshly Pieced.  Be sure and check out these blogs for even more quilty inspiration.

Tuesday, February 18, 2014

Star Light Star Bright QAL – HSTs

This weeks assignment for the Star Light Star Bright Quilt Along at Happy Quilting was to sew up all the MANY half square triangles.

Before the triangles could be sewn, a final color placement needed to be determined to know what fabrics to sew together.  With this QAL, there are lots of placement options and I have to admit, I agonized for days on this.


Melissa thoughtfully supplied some coloring sheets to assist with the layout but as I am a very visual person, I ended up putting the entire quilt up on a design wall  and played with various layouts.


One of the fabrics I am using are circles printed in lots of colors.  There were a few blocks I changed as the contrast was not strong enough.

I love the blocks though and hope to find another use for them in the future.


Trimming up all those HSTs was a breeze with my Bloc Loc ruler.   The task is still tedious though so watching the Olympics definitely helped.


http://happyquiltingmelissa.blogspot.com/p/quilt-longs.html

Hurray...my half square triangles are done and I'm awaiting next week's assignment!


http://www.bloglovin.com/blog/5198185

I will be sharing this with the following linky parties. Linky Tuesday at Freemotion by the River, Let's Bee Social at Sew Fresh Quilts, WIP Wednesday with Freshly Pieced and Fabric Tuesday at Quilt Story.  Be sure and check out these blogs for even more quilty inspiration.
01 09 10