Wednesday, January 29, 2014

Scrap-A-Palooza! Quilt #1 Finish (Part Four)

It was so much fun to discover over the past week how many people were sewing along and having fun with scraps.  A few people have even finished their quilt top so I will be sharing some pictures later in the post!


Here we are at the final post for Quilt #1.  At this step, the quilt should be quilted and bound and ready to share!  Not started yet?  No worries, I will be setting up a separate page with photos of each quilt and links to all the parts so you can sew them up if you so desire in the future.


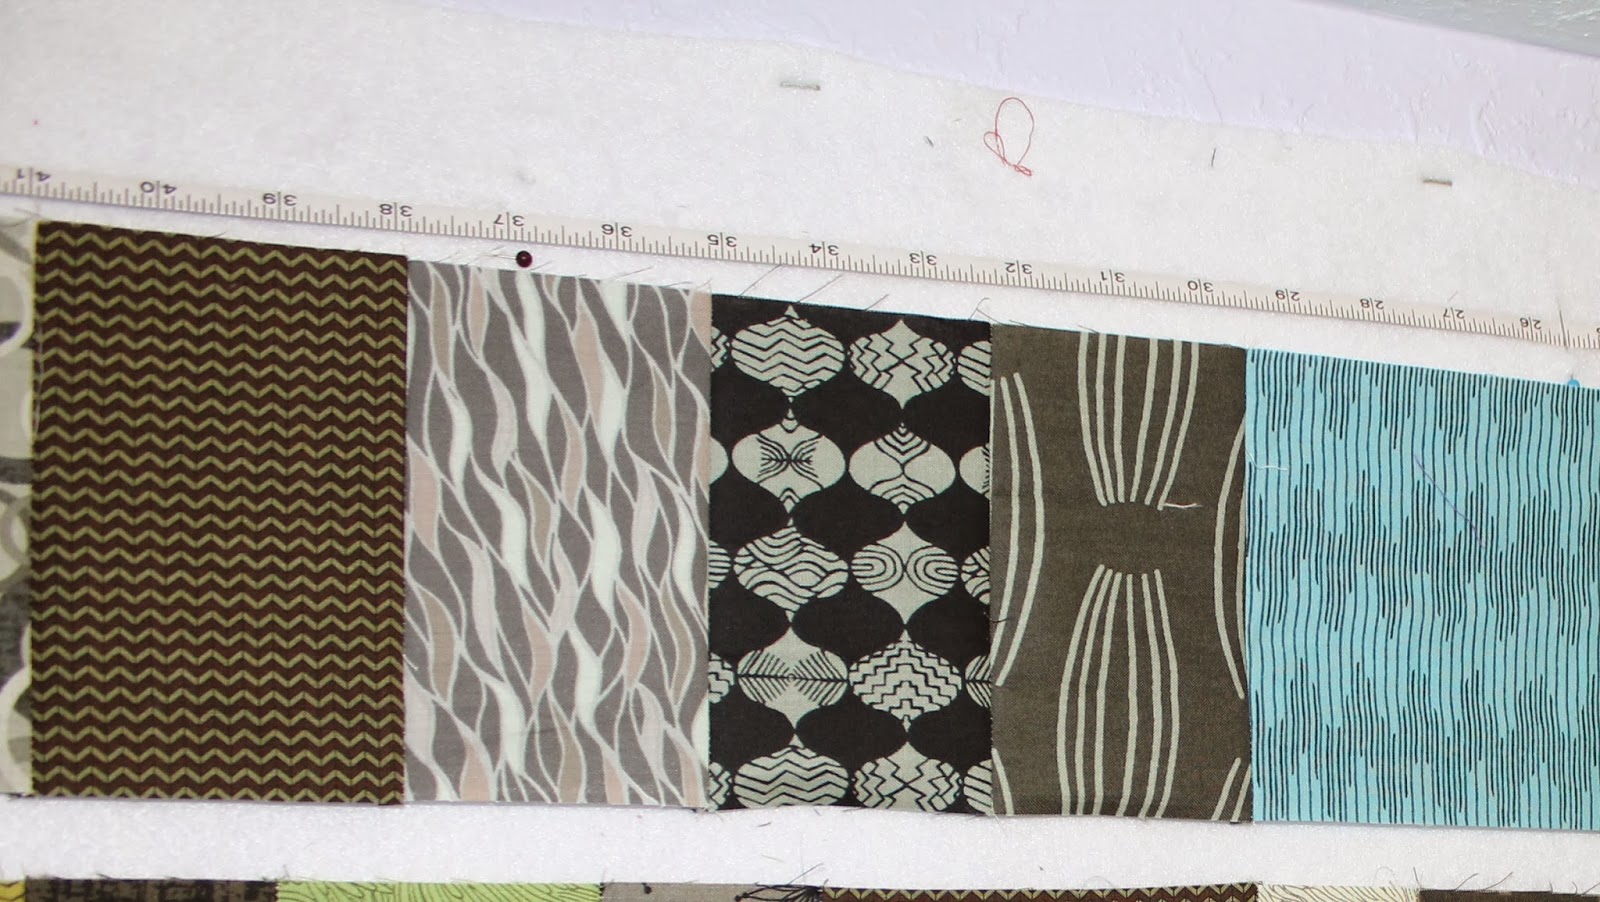
In Part One, we narrowed our colorways and pulled our scraps.


We also determined our row height and cut our scraps to size.


Part Two had us laying out our blocks and sewing up our strips.


This quilt works great as a leaders and enders project!


Last week in Part Three, we added sashing and talked about some quilting options.


And just how did I quilt mine?


My initial plan was to simply quilt some horizontal straight lines  But because my backing was a stripe, I didn't want to try and match the stripes....


...so I ended up going with some wavy quilting in a black thread.


Another easy peasy quilting design!


Here is a picture of the finished quilt.  It definitely has a very masculine feel to it!

And now for a few statistics:

Size: 46 x 57"
Fabric: Used Parson Gray scraps as Inspiration.  All the fabric came from the scrap bin
Total Pieces: Approx 153 pieces ranging from 1.5" x 5" up to 7" x 5".
Sashing Fabric Used: 3/4 yard


 And some other photos to share using this pattern:


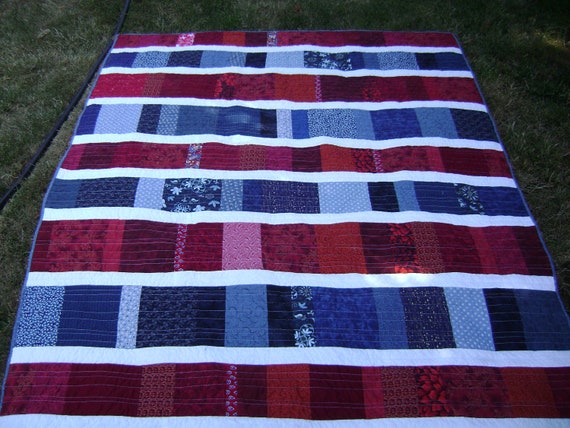
Here is a twin quilt I made alternating red and blue bars of scraps.  Note that even the height of the rows are different to get the best yield out of scrap sizes.


Here is the quilt top finished by Barb over at Mountain Quiltworks.  The blue sashing really sets off nicely the bright colors she chose from her stash.


Such a happy quilt!


Here is a quilt top a non-blogging friend of mine finished this week.  She made this entirely from the scraps leftover from a previous project!  She ran her strips vertically and used varying widths.  I also liked how she only placed sashing between some of the rows.


Love the teal solids in this one!


I wanted to share another quilt of mine using this pattern where I chose not to use any sashing at all.  Instead, I sewed in a small solid strip between the prints in the rows.


This is a great way to use up those leftover chunks of fabrics!


There are a few more projects out there so I hope to add more pictures at a later date.  The fabrics you use and the block sizes you choose can really change the look of these quilts.  I hope you find some inspiration in your scrap bin and give it a try.  Please share pictures if you do...I would love to see them!


Curious what Quilt #2 will be?  You will have to wait until the first week of February to find out!  I will tell you that it will be appropriate for using those bigger chunks of scraps, charm squares or if you precut your scraps into 2 1/2", this quilt will be perfect.  Hope you stay tuned.

Why Scrap-A-Palooza?  Because Quilting is more fun than Housework!


http://www.bloglovin.com/blog/5198185

Linking up with My Quilt Infatuation, Live A Colorful Life, Pretty Bobbins, TGIFF, Richard and Tanya Quilts, Crazy Mom Quilts and Confessions of a Fabric Addict.

FairyFace Designs

If you are sewing along, don't forget to link your Scrap-A-Palooza quilt over at FairyFace Designs for Sarah's Put Your Scraps To Work series.

Tuesday, January 28, 2014

Star Light Star Bright Quilt-A-Long (Sure I can!)


At the last minute I have decided to join Melissa in her Star Light Star Bright Quilt-A-Long.  I have been waffling with the decision ever since she announced it in early January.  I thought I had finally convinced myself that I really didn't have time to participate and had erased it from my schedule and project list.


 My how things can change in a day!  I guess my defiant self is who got out of bed this morning and  decided to heck with sleep for the next few weeks.  I so enjoyed the Star Surround quilt I made in Melissa's last QAL,  I really do want to join in so I pulled some fabric, put it back on my project list and wrote it back into my blog schedule.


I decided to go with some Malka Dubrawsky fabrics I had purchased some time ago.  This is from her Simple Marks line.

I also pulled some dark blue Quilter's Linen and an older Moda cross weave for some possible backgrounds.  Not sure yet which way I will go.


I am hoping to work this amazing fabric in and create some fun effects in the HSTs.  I plan on making the 28" blocks so if my math is correct, these squares should just work!


I'm excited to get started!


http://www.bloglovin.com/blog/5198185

Sharing my madness with Freemotion by the River, Quiltstory, Sew Fresh Quilts and Freshly Pieced.  If I tell enough people, then I'm committed to the project!


Sunday, January 26, 2014

Paper Piecing - I did it!

When I decided to join the Sew Kitschy block of the month with Kristy over at Quiet Play, I did it with a lot of hesitation.  I have not had very good experiences in the past with paper piecing and was worried this project would quickly become a chore and languish in some drawer.


I am so happy to say I finished the first block!  Granted, it was a pretty easy block but it has proven to me that paper piecing really isn't painful and it can be accomplished with minimal stress!  I was at first completely stumped how to get started and I did have to get the seam ripper out quite a few times but I am so proud of the finished block. 

Quiet Play 


Now I find myself impatiently awaiting the next pattern....

Kristy, you have another convert on your hands!


http://www.bloglovin.com/blog/5198185

I'm going to be sharing this with Kristy at Quiet Play, Anything Goes Mondays at Stitch by Stitch, and Design Wall Monday at Patchwork Times.  Hope you take some time to visit these blogs and see what others are working on.

Friday, January 24, 2014

Orphan Blocks

If you have been following my blog long, you know I love the challenge of taking orphan blocks and making them into something fun.  I thought I would share two finished baby quilts I made from pieces that were headed to the trash bin.


A friend of mine brought me this lovely piece to be quilted up.  The pattern is Northern Lights by Jaybird Quilts and it is done in beautiful Kona Solids.


(The straight line quilting is actually done in 5 different colors of thread.)


As she was piecing up the top, she decided the quilt was getting too long and ended up not sewing on the last two pieced strips.

When she brought me the quilt, she gave me these little beauties.


Easiest quilt ever....I simply ripped out one seam on each strip and attached the strips to an older Alexander Henry fabric I had in my stash.


Is this not the most adorable fabric!?


I think the fabric is called "Just Hangin".


My friend also made this quilt using the Ballerina pattern by Jaybird Quilts.

Once again the quilt top was too long but this time a rotary cutter was used to take a few rows off the bottom.


This added a bit of a challenge as once I took a seam ripper to the strips, the triangles were missing big hunks out of the corners.


...but I love a challenge!


With a lot of creativity and a little quilter's caulk sashing, I ended up with this little quilt.

I think the only fabric that came from my stash was two of the side triangles and the 4 strips of sashing.  Everything else was salvaged.


And because yellow and black always make me think of bumblebees,  I ended up having a little fun with the backing.


My Button
So I am off to a good start this year in my goal of finishing up some projects.  The yellow and black quilt I had as my January goal for A Lovely Year of Finishes over at Sew Bitter Sweet Designs.
http://www.bloglovin.com/blog/5198185


I will be celebrating this finish with others at Can I get a Whoop? Whoop? over at Confessions of a Fabric Addict, TGIFF, LAFF at Richard and Tanya Quilts, Finish it up Friday at Crazy Mom Quilts, Show off Saturday at Sew Can She and A Stitch in Time at Such a Sew and Sew. 

January Finishes

Tuesday, January 21, 2014

Scrap-A-Palooza! Quilt #1 Part Three

Here we are, already on part three of our quilt sew along!  Hope those joining in are enjoying seeing their scrappy quilts come to life.  Barb over at Mountain Quiltworks has already gotten her rows sewn together and Diann at Little Penguin Quilts is finishing up getting her scraps cut!  

How fun it will be to see everyone's finished quilt top!


Last week, we started sewing our rows together.  You can sew them together pulling them off your design wall as you go or use the row markers like I suggest in the last post and sew them up as you sew other projects using the leaders and enders method I mentioned.

You can press your seams all to one side as there will be no seams to be matched up. (Gotta love that!)


Once you get them all sewn, it is time to decide on a sashing.  (You can also decide to just skip the sashing - it's your quilt, go with what you like!)  Once you have your fabric chosen, you need to decide on how wide to cut your strips and if you want the sashing to run on the top and bottom.

I had chosen a black solid to use as mine.  It was a 3/4 yard piece I had that was a different dye lot than the yardage that was in my stash.  Because I had a limited amount, I did some quick math and determined if I cut the sashing at 2", I would have just enough to have a slighter larger sashing on the top and bottom and use up all the fabric.

I put it up on my design wall so you could see how it is coming together.


Now it is time to sew it up!

...well, not quite.  One would think that you could just sew all the strips together and just trim off the uneven edge.  I have learned that in doing this, you may end up with a quilt top that is a lot wider on the bottom than the top. (This is caused by the way your machine feed dogs pull the fabric through.)

To prevent this, I find my shortest strip and measure it.  Then I trim all other strips to that width.  Before I sew two strips together, I pin at the beginning, the end and the middle of the strips to ensure the quilt stays squared up.  When I press, I press toward the sashing so everything looks nice and flat.


Before you know it, you will have a quilt top all ready for quilting!


....and most importantly a few less scraps in your sewing room!

Now if you are really lucky like me, you will already have a fabric in your stash that will work for the backing. 


And speaking of quilting, I thought I would also give some suggestions on some quilting patterns for those who might want to try something new!  Remember, this is a scrap quilt so it is perfect for practicing your FMQ.  I think accentuating the horizontal bars looks great and you can use those horizontal seams as a guide to keep your stitches straight.


https://blogger.googleusercontent.com/img/b/R29vZ2xl/AVvXsEgG5xaZHRT5K9cpbN_ypVx9OuoTYawrG5J-f9618vgi48MhjSZlMPvplq2sSR8ttuA7XPqrVbW16LxHzsJurZ6h3OegcyhDJ_7z9-JfESS8nST_dJTUlmyl59zde5mlD38ZLhbtflUFcDE/s1600/DSC01527.JPG


This quilt really lends itself to some straight line quilting with a walking foot.   You can space them out evenly or quilt irregularly spaced lines like this one.


Want to practice a little free motion?  A soft curvy line is also fun.

Depending on your machine, you can also program in a serpentine stitch and use a walking foot and get a similar look.  Just check your manual to see if your machine has the capability.


For the very adventurous, here is a fun swirl that would also work well.  Just start by quilting a swirl and travel down to where you want the next swirl to be.  Needle down and then reposition your hands and go into the next swirl going in the opposite direction.  Easy Peasy!


Here's an overview of the important stuff to keep you moving along!
  • Finish sewing up horizontal rows
  • Choose sashing material and cut to size
  • Trim all strips to desired width
  • Finish sewing up the quilt top and pick out a backing
  • Choose a quilting pattern and start quilting!

I should have my quilt all finished for next week.  I am hoping to share not only some of my other quilts made using this pattern but also some being made by others.  While many may not be completely finished, it will still be fun to see them.
  If you are sewing along, feel free to grab the button in the sidebar to share with your readers what you are up to.  And if you have any questions, don't hesitate to contact me.

Now let's get back to the Party!


http://www.bloglovin.com/blog/5198185
Linking up with Linky Tuesday at Freemotion by the River, Quiltsy, WIP Wednesday at Freshly Pieced, Let's Bee Social at Sew Fresh Quilts and Needle, I Quilt Thursday at Pretty Bobbins and Thread Thursday with My Quilt Infatuation.

Saturday, January 18, 2014

When Fabrics Bleed

About 5 years ago, I quit pre-washing my fabrics.  Nor do I use color catchers.  Even with all the quilts I sew up each year, it is rarely that I have an issue with dyes bleeding in today's fabric.  
But every once in a while....


I'll be honest, I was hoping this would happen some day so I could share a product that I find to be a perfect fix for these annoying disasters.  It is in this little bottle labeled Synthrapol.

I usually always check my quilts when they come out of the washer the first time, but on this quilt, I didn't see that the fabrics had ran until I had dried it in a hot dryer.  
(Gasp...OK, that made me a bit nervous!)


But I quickly just threw it back into the washing machine with a teaspoon or two of this product and gave it a warm wash with a cold rinse.  I was very pleased to see that all the dye was gone and the quilt was perfect again!

Then to really test that all the excess dyes had been removed, I washed it again and left the quilt scrunched up in the washer for about 3 hours.  Yep...I was willing to take one for the team!  
There were no problems whatsoever!

I get this little product at my local fabric store.  So next time you are doing a little stash shopping, be sure and pick up a bottle to have on hand.  It usually runs about $4 and will save you from some possible heartache in the future.

(BTW - I think the darkest blue on the edge is the fabric that ran.  It was a scrap I had and is not a Kona solid.  I am not even sure where it came from.)

http://www.bloglovin.com/blog/5198185


Linking up with Molli Sparkles for Sunday Stash and Stitch by Stitch for Anything Goes Monday.

Friday, January 17, 2014

Log Cabin Beauty

I am so pleased to share another finished quilt!  After I tallied up all the UFOs I had at the end of the year, out of embarrassment, I vowed to get some of these half finished projects checked off the list.


I just pulled this beauty out of the laundry so it is now ready to be loved.  It is the perfect size for some sofa snoozing at 52" x 68".  I might just have to try it out later this evening.


I quilted a fun daisy and loop pattern over the entire quilt in a beige thread.  I thought it would work well with the 30's prints used throughout the quilt (you can read more about the quilt top here.)


I was also able to find two larger cuts of some 30's fabric in my stash that worked perfectly for the backing.  Between the churn dash and this log cabin quilt, I am finally making a dent in my older reproduction fabrics.  It feels good to be making room for some fun, modern prints.
Now to figure out what to buy....

http://www.bloglovin.com/blog/5198185

I will be celebrating this finish with others at Can I get a Whoop? Whoop? over at Confessions of a Fabric Addict, TGIFF, LAFF at Richard and Tanya Quilts, Finish it up Friday at Crazy Mom Quilts, Show off Saturday at Sew Can She and A Stitch in Time at Such a Sew and Sew. 

January Finishes

Wednesday, January 15, 2014

Scrap-A-Palooza! Quilt #1 Part Two


Here it is - the second part to our scrappy sew along!  I was so pleased to see everyone's comments regarding the first post on my scrap series - I  really appreciated all the support!  I know a few of you are sewing along and I cannot wait to see what fun quilts you come up with!


***Before I get too far along, I must apologize for the lack of photos on some of these steps.  When I do find time in my sewing room, I am usually sewing on two or more projects at a time.  I was sure I took lots of photos as I was sewing but when I sat down to write the post, it appears I only thought I took them!  (sigh) Please have patience with me as I get my rhythm down on this series.  I am going to try a different approach on next month's project!***


Last week in Part One, we got everyone choosing fabrics and determining cut sizes.   Because I think sewing up your scraps should be painless and enjoyable, we will keep this week's activities simple too.


You will need to clear off your design wall (or floor) to do a bit of planning for this week's assignment.  Once you find some time, loosely start laying out your scraps in bars.

Remember there will be sashing between the rows so don't worry too much about the same fabric being above or below. 


We determined a desired width for our quilts last week so you will want to lay out enough blocks across to get to that chosen width.  One trick I use is I have a small measuring tape pinned across the top of my design wall to use as a reference.  You can also pin one vertically for length.

Remember, to overlap the pieces by 1/2" to account for the seam allowance.


(Or for those who like quilt math, just count the number of pieces in your row and divide by 2.  This will also give you how much shrinkage in inches there will be due to to seam allowances.  I prefer this to overlapping.)


Once you get all the blocks up on the wall, step back and check that the lights, darks and what I call "eye catchers" are spread throughout the quilt.  You might also realize at this point that you need to cut a few more pieces to get to the size quilt you want.

I find I am most successful if I do this step quickly and try not to over think it.  I simply mix up colors and block sizes as I go.

Note: If you "named your quilt" and pulled fabrics accordingly, you should find laying out the top will be quick and easy as your scraps will all work together.


Last week, I mentioned I wanted to try to work in some strip piecing that was left over from a previous quilt. On this quilt I grouped them all together in one row (the bottom row in this picture.)  

Grouping them creates an area of interest among all the randomness.  Sometimes I will insert whole orphan blocks into quilts like this.


Unfortunately, this detail doesn't show up much with these fabrics but it is still a great way to use up all those pieces floating around your sewing room.


Once you have everything placed as you want it, you can pull the pieces down off the wall.  On each row, I grab the left most piece and safety pin a beautiful row marker (...made from a bit of fabric from the trash and a marker of some kind.)  I then pull the entire row off in order from left to right. (To keep the row organized, I use the safety pin to pin the entire row together.)


Your rows are now ready to be sewn together.  I love this piecing pattern because it can be sewn in between another project's blocks as a leader/ender.  Just work on one row at a time to minimize confusion.  Keep the pile of blocks next to your machine and the row marker always pinned to that first block (this is why I use a safety pin).  As you sew each piece onto the strip, you know it is placed at the end furthest from the row marker.  I just continuously work these through as I sew up blocks for another quilt. (You can go back and press the strip once you have it all sewn together.)

We will talk more about sewing up the strips and the rest of the top next time but feel free to start sewing up your rows now if you have the time this week. 
I think you will find you'll have a scrappy quilt top sewn together in no time at all!

Here's an overview of the important stuff to do before the next step!

  • Find time on your design wall
  • Layout the rows to the desired quilt size
  • Pull off blocks by each row from left to right keeping rows organized with a row marker
  • Start piecing rows together (I use these as leader/enders while I sew other quilt blocks)

I always enjoy starting to see a scrap quilt come to life.  Hopefully you are starting to enjoy what you are creating from your scraps.  You will find each quilt using this same pattern will look very different, depending on the type and color of fabrics used. If you are sewing along, feel free to grab the button in the sidebar to share with your readers what you are up to.  And if you have any questions, don't hesitate to contact me.

Now let's get back to the Party!

http://www.bloglovin.com/blog/5198185

Linking up with WIP Wednesday at Freshly Pieced, Let's Bee Social at Sew Fresh Quilts and Needle and Thread Thursday with My Quilt Infatuation.
01 09 10