Showing posts with label Process. Show all posts

Sunday, February 2, 2014

Star Light Star Bright QAL - Cutting the Fabric


Just last week, I made an eleventh hour decision to join the Star Light Star Bright Quilt-A Long over at Happy Quilting. The cutting instructions were sent out last Wednesday and I am happy to say I have my pieces all cut out!


I am loving these Malka Dubrawsky fabrics I chose for the project. These four prints are from her Simple Marks line. I think they look great with the warm tan fabric I have chosen for the background.


I can't wait to start sewing on this.


If you haven't seen the quilt, you can check it out below.  I am only making 4 blocks but at 28"each, the quilt will still be a nice lap size.


There is still time to join in on the fun! How about you, are you in?


Be sure and check out Melissa linky party to see what great fabrics others are using. There are so many beautiful color combinations - you really will want to check them all out.


http://www.bloglovin.com/blog/5198185


 Linking up with Happy Quilting and Sunday Stash at Molli Sparkles.

Tuesday, January 21, 2014

Scrap-A-Palooza! Quilt #1 Part Three

Here we are, already on part three of our quilt sew along!  Hope those joining in are enjoying seeing their scrappy quilts come to life.  Barb over at Mountain Quiltworks has already gotten her rows sewn together and Diann at Little Penguin Quilts is finishing up getting her scraps cut!  

How fun it will be to see everyone's finished quilt top!


Last week, we started sewing our rows together.  You can sew them together pulling them off your design wall as you go or use the row markers like I suggest in the last post and sew them up as you sew other projects using the leaders and enders method I mentioned.

You can press your seams all to one side as there will be no seams to be matched up. (Gotta love that!)


Once you get them all sewn, it is time to decide on a sashing.  (You can also decide to just skip the sashing - it's your quilt, go with what you like!)  Once you have your fabric chosen, you need to decide on how wide to cut your strips and if you want the sashing to run on the top and bottom.

I had chosen a black solid to use as mine.  It was a 3/4 yard piece I had that was a different dye lot than the yardage that was in my stash.  Because I had a limited amount, I did some quick math and determined if I cut the sashing at 2", I would have just enough to have a slighter larger sashing on the top and bottom and use up all the fabric.

I put it up on my design wall so you could see how it is coming together.


Now it is time to sew it up!

...well, not quite.  One would think that you could just sew all the strips together and just trim off the uneven edge.  I have learned that in doing this, you may end up with a quilt top that is a lot wider on the bottom than the top. (This is caused by the way your machine feed dogs pull the fabric through.)

To prevent this, I find my shortest strip and measure it.  Then I trim all other strips to that width.  Before I sew two strips together, I pin at the beginning, the end and the middle of the strips to ensure the quilt stays squared up.  When I press, I press toward the sashing so everything looks nice and flat.


Before you know it, you will have a quilt top all ready for quilting!


....and most importantly a few less scraps in your sewing room!

Now if you are really lucky like me, you will already have a fabric in your stash that will work for the backing. 


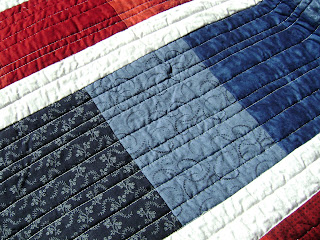
And speaking of quilting, I thought I would also give some suggestions on some quilting patterns for those who might want to try something new!  Remember, this is a scrap quilt so it is perfect for practicing your FMQ.  I think accentuating the horizontal bars looks great and you can use those horizontal seams as a guide to keep your stitches straight.


https://blogger.googleusercontent.com/img/b/R29vZ2xl/AVvXsEgG5xaZHRT5K9cpbN_ypVx9OuoTYawrG5J-f9618vgi48MhjSZlMPvplq2sSR8ttuA7XPqrVbW16LxHzsJurZ6h3OegcyhDJ_7z9-JfESS8nST_dJTUlmyl59zde5mlD38ZLhbtflUFcDE/s1600/DSC01527.JPG


This quilt really lends itself to some straight line quilting with a walking foot.   You can space them out evenly or quilt irregularly spaced lines like this one.


Want to practice a little free motion?  A soft curvy line is also fun.

Depending on your machine, you can also program in a serpentine stitch and use a walking foot and get a similar look.  Just check your manual to see if your machine has the capability.


For the very adventurous, here is a fun swirl that would also work well.  Just start by quilting a swirl and travel down to where you want the next swirl to be.  Needle down and then reposition your hands and go into the next swirl going in the opposite direction.  Easy Peasy!


Here's an overview of the important stuff to keep you moving along!
  • Finish sewing up horizontal rows
  • Choose sashing material and cut to size
  • Trim all strips to desired width
  • Finish sewing up the quilt top and pick out a backing
  • Choose a quilting pattern and start quilting!

I should have my quilt all finished for next week.  I am hoping to share not only some of my other quilts made using this pattern but also some being made by others.  While many may not be completely finished, it will still be fun to see them.
  If you are sewing along, feel free to grab the button in the sidebar to share with your readers what you are up to.  And if you have any questions, don't hesitate to contact me.

Now let's get back to the Party!


http://www.bloglovin.com/blog/5198185
Linking up with Linky Tuesday at Freemotion by the River, Quiltsy, WIP Wednesday at Freshly Pieced, Let's Bee Social at Sew Fresh Quilts and Needle, I Quilt Thursday at Pretty Bobbins and Thread Thursday with My Quilt Infatuation.

Wednesday, January 15, 2014

Scrap-A-Palooza! Quilt #1 Part Two


Here it is - the second part to our scrappy sew along!  I was so pleased to see everyone's comments regarding the first post on my scrap series - I  really appreciated all the support!  I know a few of you are sewing along and I cannot wait to see what fun quilts you come up with!


***Before I get too far along, I must apologize for the lack of photos on some of these steps.  When I do find time in my sewing room, I am usually sewing on two or more projects at a time.  I was sure I took lots of photos as I was sewing but when I sat down to write the post, it appears I only thought I took them!  (sigh) Please have patience with me as I get my rhythm down on this series.  I am going to try a different approach on next month's project!***


Last week in Part One, we got everyone choosing fabrics and determining cut sizes.   Because I think sewing up your scraps should be painless and enjoyable, we will keep this week's activities simple too.


You will need to clear off your design wall (or floor) to do a bit of planning for this week's assignment.  Once you find some time, loosely start laying out your scraps in bars.

Remember there will be sashing between the rows so don't worry too much about the same fabric being above or below. 


We determined a desired width for our quilts last week so you will want to lay out enough blocks across to get to that chosen width.  One trick I use is I have a small measuring tape pinned across the top of my design wall to use as a reference.  You can also pin one vertically for length.

Remember, to overlap the pieces by 1/2" to account for the seam allowance.


(Or for those who like quilt math, just count the number of pieces in your row and divide by 2.  This will also give you how much shrinkage in inches there will be due to to seam allowances.  I prefer this to overlapping.)


Once you get all the blocks up on the wall, step back and check that the lights, darks and what I call "eye catchers" are spread throughout the quilt.  You might also realize at this point that you need to cut a few more pieces to get to the size quilt you want.

I find I am most successful if I do this step quickly and try not to over think it.  I simply mix up colors and block sizes as I go.

Note: If you "named your quilt" and pulled fabrics accordingly, you should find laying out the top will be quick and easy as your scraps will all work together.


Last week, I mentioned I wanted to try to work in some strip piecing that was left over from a previous quilt. On this quilt I grouped them all together in one row (the bottom row in this picture.)  

Grouping them creates an area of interest among all the randomness.  Sometimes I will insert whole orphan blocks into quilts like this.


Unfortunately, this detail doesn't show up much with these fabrics but it is still a great way to use up all those pieces floating around your sewing room.


Once you have everything placed as you want it, you can pull the pieces down off the wall.  On each row, I grab the left most piece and safety pin a beautiful row marker (...made from a bit of fabric from the trash and a marker of some kind.)  I then pull the entire row off in order from left to right. (To keep the row organized, I use the safety pin to pin the entire row together.)


Your rows are now ready to be sewn together.  I love this piecing pattern because it can be sewn in between another project's blocks as a leader/ender.  Just work on one row at a time to minimize confusion.  Keep the pile of blocks next to your machine and the row marker always pinned to that first block (this is why I use a safety pin).  As you sew each piece onto the strip, you know it is placed at the end furthest from the row marker.  I just continuously work these through as I sew up blocks for another quilt. (You can go back and press the strip once you have it all sewn together.)

We will talk more about sewing up the strips and the rest of the top next time but feel free to start sewing up your rows now if you have the time this week. 
I think you will find you'll have a scrappy quilt top sewn together in no time at all!

Here's an overview of the important stuff to do before the next step!

  • Find time on your design wall
  • Layout the rows to the desired quilt size
  • Pull off blocks by each row from left to right keeping rows organized with a row marker
  • Start piecing rows together (I use these as leader/enders while I sew other quilt blocks)

I always enjoy starting to see a scrap quilt come to life.  Hopefully you are starting to enjoy what you are creating from your scraps.  You will find each quilt using this same pattern will look very different, depending on the type and color of fabrics used. If you are sewing along, feel free to grab the button in the sidebar to share with your readers what you are up to.  And if you have any questions, don't hesitate to contact me.

Now let's get back to the Party!

http://www.bloglovin.com/blog/5198185

Linking up with WIP Wednesday at Freshly Pieced, Let's Bee Social at Sew Fresh Quilts and Needle and Thread Thursday with My Quilt Infatuation.

Wednesday, January 1, 2014

Hello 2014!


I have to admit, 2013 was just a blur.  Every day seemed to fly by...


Balancing maintaining a home, running a very successful at home business (I am a longarm quilter) and starting new endeavors like blogging and quilt design left me quite busy and very overwhelmed at times.


I spent this morning preparing for the new year by updating business spreadsheets, taking a physical inventory for my accountant and reviewing my business plan.  This will be my 8th year quilting for others.  It is hard to believe it has been that long!


Looking back at my records, I have quilted well over 1000 quilts for others.  That is miles and miles of thread! 

I have a wonderfully loyal customer base and consider many of them close friends.


One of the great things about quilting for others is I get to be a part of so many wonderful quilts.  Many I would never piece myself but from each I am always inspired.


Many of my customers are such talented piecers. 

Thanks to some of them, I always get to see the newest lines of fabric.


The fabric and color combinations in some of these quilts make it difficult to not want to make one for myself.


(This hopefully explains why I start so many quilts!)
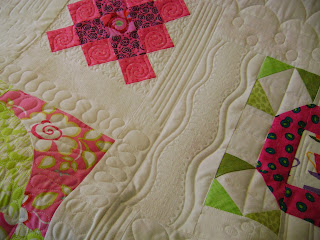


I usually only share customer quilts on my Facebook page but I felt they were just as important to my success in 2013 as the quilts I made myself.


...and speaking of my own quilts.  There were lots of those too!


I started 2013 with a list of 42 projects in the works.  This sounds like a lot but some are long term quilts like hand quilting, EPP and applique.

I'm starting out 2014 with 47...sigh.  Guess what I will be focusing on this year!

I did finish 60 quilts in 2013.  And 6 of them were projects I started many years ago so that was good.  Most of these victories were due to joining in some Finish-A-Longs, so I will be doing that again in 2014. 

Do you think I can finish out 2014 with less than 35 WIPs?


Of the 60 quilts, 21 were made from scraps and 27 were made from my existing stash.  Those numbers make me happy as I really didn't spend a lot of money on fabric.  You would think I would have run out of fabric, but I am always amazed at how little fabric you need to make a quilt with.

I think this quilt was my favorite scrap quilt made in 2013.  It seemed to have a life of its own and I really enjoyed watching it evolve.


I only made about half a dozen quilts that I actually purchased at least some fabric for.


My favorite quilt of the year was the Star Surround quilt.  I rarely get attached to quilts but this one is a keeper.


I plan on joining in to this year's Quilt-A-Long with Melissa.  I haven't firmed up the colors yet but I know navy will be among them.


2013 was also the year I had my first publication of an original design.  Over the year, there were a total of three quilts published.

You will be seeing more publications in 2014 and if I can find the time, maybe some patterns available for purchase.


What I am most excited about for 2014 is the scrap series I am putting together. As I make my scrap quilts, I will be sharing my process on what inspires me, how I choose patterns and layouts, tutorials on the blocks and even ideas for quilting.  The posts will be written in such a way as to guide readers who want to work through their own scraps to sew along and make their own quilt based on their personal style of quilting.  I am hoping with each new quilt, more quilters decide to join in.

Quilting is more fun than Housework
<a href="http://quiltingismorefunthanhousework.blogspot.com/" target="_blank"><img src="https://blogger.googleusercontent.com/img/b/R29vZ2xl/AVvXsEhjl-ZgzJ55jRKwQPawzgdAmpsJ7szfSNzI2RRMocZd_hYYVeUyBf9pv8KpH-i7Rfezc9zAERDgfS-XUlDwJnTx4vVOF_o0fhCUZdgyj-fIhnKoEgze75WPi3It9BO4n3hZXF4dnkctu7U/s1600/Publication2.jpg" alt="Quilting is more fun than Houseowrk" width="125" height="125" /></a>

The best part of 2013 was getting to know so many of you.  I am so inspired by what I see in so many of your blogs and encouraged by my readers support and comments. I truly do appreciate all of you and look forward to seeing what 2014 brings.  Cheers!
http://www.bloglovin.com/en/myblog


Linking up with Lily's Quilts Fresh Sewing Day, Confessions of a Fabric Addict for 2014 Goals and Sarah Quilts for the Year in Review.  Be sure and check out what others are planning for the new year!

Sunday, March 31, 2013

A Screeching Halt

March has been such a successful month for me.  I have finished a number of old WIPS that have been hanging around for years,  I purged my fabric stash again and cleaned out older fabrics for scrap quilts, and worked on some new piecing designs.  My design walls were constantly full and a total of 8 quilts were finished.


But the quilt I was really hoping to get off the design wall was the christmas quilt I started back in January.  I have been slowly cutting it and piecing the blocks between all the other projects.  It is one of those designs you really have to get it all up on a wall before you start sewing the blocks together.


Well, I got it all laid out so I finally decided to start to piece it all together and it quickly came to a screeching halt...

The first color went together perfectly but when I got to the next color.....
Oh crap dear!


It appears I have proceeded to miscut about half of my blocks!  I am hoping I just need to trim off  about 1/4" but I will need to go through and check each one to identify which ones need trimming.


Grrr....Usually this is where a project is bagged up and thrown in the closet.


But I am determined to persevere through this and keep working on it.  I will try and trim a few each evening until I'm sure everything will fit...


The truly frustrating thing is I know exactly what I did.  I cut the blocks over two nights and on one night, I obviously misread my ruler and lined up the fabric to a white line rather than a black.  And the sad part is, when I teach a class using these specialty rulers, I always suggest to my students to mark their rulers with some neon highlighting tape.

That will teach me for not listening to my own advice!


If you haven't seen this product, it is made by Omni-Grid and is called Glow-Line Tape.  It has three rolls to a package in fun neon colors.  The tape is low tack so it doesn't leave a residue on your rulers when you peel it off.  I suggest having some on hand.  If you are a local customer, I have some in stock if you can't find it.  It is a simple thing that can save you so much time....


Thank goodness this quilt is for next christmas so I have another 8 months to work on it!

Sharing this time saving idea with a few linky parties:

Let's Get Acquainted at Pixels to Patchwork
Linky Tuesday at Freemotion by the River
Show and Tell Tuesday at I Have To Say...
WIP Weds at Freshly Pieced

Thursday, March 14, 2013

Time

As many of you know, I have been slowly reorganizing and cleaning up my sewing room.  Working away in there, I am always loosing track of time so I have been looking for a fun clock to put on the wall.  Not finding what I wanted, I decided to make one.  It was so easy and fun, I decided to share the process with you.


 Here's what you will need...
     1. A clock mechanism
     2. A deep canvas (deep enough for the
             clock mechanism)
     3. Staple Gun
     4. Scrap cotton batting
     5. Sharp Pointed scissors
     6. A fun fabric


I used a 8" square canvas.  I laid fabric over the canvas to select what motif I wanted on the clock face.  I then roughly cut the fabric so it was large enough to wrap around the canvas.  I placed batting between the canvas and the fabric for a softer look.  I started stapling from the center...


Getting the corners right was a little tricky but I ended up with everything all stapled down.  I then trimmed it up closer (the picture to the right is untrimmed).  If you wanted to hot glue some wide ribbon to hide all the rough edges, you definitely could.  As it hangs on the wall, I wasn't worried about it.


I did find it was necessary to place a few layers of batting between the  clock mechanism and the canvas.  Otherwise there is a small gap and the mechanism pulls on the canvas.  I just cut a small X in the batting so the threaded area for the hands could come through.


To make a hole for the clock mechanism to come through, I used some sharp pointed scissors (not my best ones) and carefully made a hole big enough to fit the clock.


It needs to be about 1/4".  Read the instructions on the clock kit you purchase.


Most clock kits come with stick on numbers.  You can choose to use them or not.  I like the look without them...


Here it is hanging in my sewing room.  I love how the clock dial is not centered and the fabric makes a fun face for the clock hands.


I made a second one for my quilting studio out of a piece from Laura Gunn's collection.  I used a much larger rectangular canvas for this one...


Caution - These little clocks are so easy and addictive, you might end up making one for every room.


If you try this and blog about it, please link back here.  I would love to see how yours turn out!

Sharing this idea with a few linky parties:

Let's Get Acquainted at Busy Bee Quilts
Fabric Tuesday at Quilt Story
Show and Tell Tuesday at I Have To Say...
WIP Weds at Freshly Pieced


Wednesday, February 6, 2013

Paint - Done!


Recently I posted that I was going to do something about the condition of my sewing room.  Remember this mess?

Even with only a few hours a day to work on it, I am glad to say I finally have the walls painted and the room somewhat cleaned out.

I painted the walls two shades of lavender and trimmed with a bright white.  I find the color very calming and I now smile when I enter the room.

Check it out - there is finally room on my cutting table for my mat!  No more cutting fabric in the livingroom....


And there is actually space around my sewing machine.  If it wasn't a project up on a design wall, it was boxed up or moved out of the room.

No more clutter on the table....


Started projects are now stored in plastic tubs and waiting to be worked on.  

Once I get some time, I hope to paint this shelf - Maybe if the sun ever comes out....


I did "hide" a few projects in a convenient cupboard under the stairs.....but I am hopeful that I will pull them out soon as I finish some of the works in progress.

As you can see, I spent some time last night working on the quilt on this design wall...Fingers crossed - it will be a finish soon.


And the christmas quilt is filling up the other design wall quite nicely.


My sewing room is such a wonderful place to work, I actually got quite a few more blocks completed on this quilt as well.


Now that the room is painted, I can start making some other improvements.  The first item on the list is to recover the ironing board - so stay tuned to see pictures of that process.  There are also some other fun projects I want to share with you - you might even want to incorporate them in your own sewing room or studio....
01 09 10