Showing posts with label raw edge applique. Show all posts

Friday, July 26, 2019

A Special Finish for my Nephew

Why do I always wait until the last minute!


My only nephew graduated from high school this year and will be going to Creighton University this Fall.  He is going to be pitching for their baseball team and I am so very proud of him.

He has known he was going to this university for over a year, but I decided to wait until a few weeks before he was leaving home to work on his quilt.  And what I thought would take me only a day or two ended up taking me forever!


But I have to say, I am quite proud of how well it turned out.  Of course there was nothing team-themed I could purchase that I could use for his quilt so I ended up drawing and appliqueing his school logo to the center of his quilt.


I used a raw edge method using fabric mod-podge.  The detail you can get from this method is simply amazing.  I would certainly do it a bit differently if I attempt something like this again.  

(Which I will admit is probably not likely - certainly not at this large scale!)


My initial plan was to make the quilt more like a whole-cloth but the bright blue was just too much for me.  I ended up cutting a whole bunch of plaid and chambray yardage I had in my stash that I actually purchased for some shirts.  I must really love this guy!

I did quilt his name directly into the patchwork.


I kept the quilting fairly simple and tried to make the quilt as durable as possible.  I put a silly text bubble fabric on the back.  Most of the bubbles are filled with "Zzzzzz".  However, I might just have to hide some other words in there just to see if he finds them.


The quilt is 72" x 88".  The center piece is 40" square.
It is a relief to get this one done and shipped!


Linking Up:


Friday, May 27, 2016

Crafted Applique New Possibilities Blog Hop


Finally!  It is my day to share with you Lara Buccella's new book "Crafted Applique....New Possibilities."


Have you seen all the wonderful projects being made with this game-changing new applique technique?  If you haven't,  I have a calendar at the end of the post so you can go visit others.


But first, check out what I made....


I received the book about a month ago.  The book does a great job explaining the crafted technique and has instructions for some wonderful projects.  But upon reading it, I was immediately drawn to try out the process with a project of my own.  I have never found raw edge applique works well with the projects I always want to attempt with it.  My fabric tears, the edges are frayed and the projects usually gets trashed before it is completed.  Let me just say, the crafted technique is a game changer!


After a quick trip to the store for a few supplies, in an afternoon I made this fun pillow for a friend who loves Jack in the Pulpits as much as I do.  I have had a remnant of Jane Sassaman's fabric in my stash for years just waiting for the perfect project.  Using Lara's technique, I was able to simply cut this glorious flower out of the fabric (as one piece) and apply it to an already quilted backing. How simple it that!


The detail I was able to get was amazing.  The fabric didn't tear no matter how close I had to cut.  And because the fabric doesn't fray, I had no issues with the topstitching.  My mind is now swimming with ideas - flower details on fabric buckets, patches on jeans and jackets, and 3 dimensional items as trims on all sorts of projects.  This pillow will definitely not be the last item you see from me using this technique!


Lara has graciously offered me a copy of the book to give away to one of you.  To be entered, just leave me a comment.  I would love to hear what you would add an applique detail to.  I will choose a random winner as I enjoy a cup of coffee on the morning of June 1st.

Please make sure you’re not a no-reply commenter (or leave an email address in your comment if you’re not sure). You cannot win if I cannot get a hold of you!

**************This Giveaway is Closed******************** 

Congratulations to Jenny!


You can also visit Lara's blog - there she has more projects to share from the book and even more giveaways.  This red and white wallhanging is one of my favorite projects in the book.


A huge thank you to Lara for including me in this hop and sharing with me her technique.  If you haven't "met" her yet, she is a sweetheart and so very supportive to all who come in contact with her.  I wish her so much success with this book!


Crafted Appliqué: New Possibilities Blog Hop
May 1st to June 5th 2016
Sun
Mon
Tues
Wed
Thu
Fri
Sat
1
Lara
Buccella
Introduce Tour   
2
Valerie Smith
3
Dana Gaffney
4
Lorna McMahon
5
Mary Schuberg
6
Heidi
Kuntz
7
Alycia Carmin
8
Amy
DeCesare
9
Sherri McConnell
10
Lara Buccella
Guest Post
11
Christina Cameli
12
Melissa Corry
13
Sarah
Craig
14
Soma Acharya
15
Valerie
Reynolds
16
Angela Pingel
17
Sandra Walker
18
Cheryl Brickey
19
Judy Murphy
20
Yvonne Fuchs
21
Cindy Pieters
22
Susie
Zlogar
23
Connie Campbell
24
Ruth
Bourke
25
Kaja
Zieslar
26
Ann
Brooks
27
Cynthia Brunz
28
Holiday
29
Holiday
30
Holiday
31
Jenn Trott-Zisserson
1
Paulette Horn
2
Sandra Jansen
3
Christine Sherman
4
Darlene Simmons
5
Lara
Buccella
Giveaway Winners Announced!        

Linking Up:
Crazy Mom Quilts (Finish it up Friday)
A Quilted Passion 


Friday, June 19, 2015

Circle Quilt Finish (and Tutorial)


While recently sorting some scraps from a friend, I was inspired to make a small baby quilt by a pretty stack of pink and gray fabrics.


I decided to add a few scraps from my own fabric and came up with this fun fabric pull.  Earlier this month, I made completing this quilt my June goal for A Lovely Year of Finishes with Sew Bittersweet Designs.


Here it is.  The Fastest. Quilt. Ever.

I have turned that little pile of larger scraps into this fun raw edged circle quilt.  
And I thought I would share a tutorial on how I did it.


Because I was cutting up some scrap pieces,  I ended up cutting quarter circles.  I used one of my 10" longarm rulers but a plate or other circle template works fine too.  If you have really big scraps, you can cut full circles and quarter them later.


 You really don't need them to be perfect.


Next, simply pin them to a corner of your background fabric.  I cut my background squares to 7". 


I then top stitched the quarter circle 1/4" from the edge to the background square.  I did back stitch at the beginning and the end (which will be hidden in the seam allowance when you sew up the blocks). 
I also shortened my stitch length a bit.


 I prepared and chain pieced all of my blocks at once.  
In minutes I had all of my blocks sewn.


Then it was just a matter of laying out the blocks and sewing up the quilt top.  For my backgrounds, I used up a leftover piece of light gray solid and some white Kona from my stash.  I love these two toned backgrounds and the irregular placement of the color.  I think it adds to the whimsy!

Because the circles are raw edged, the edges of the circles will fray a bit with each washing.


Here are a couple past quilts I have made using this process.  You can play around with the placement and the circle sizes!

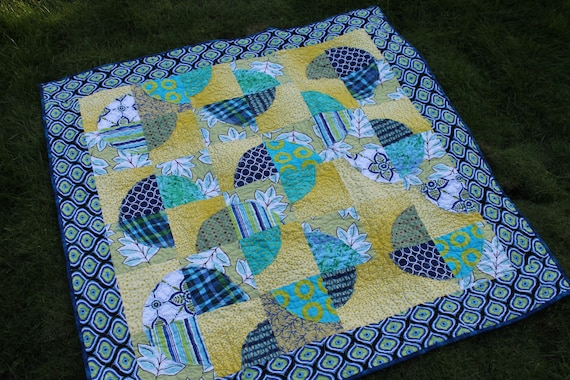
Playful Baby Quilt featuring Raw Edge Applique Circles in Blue, Turquoise, White and Acid Yellow


A Lovely Year of Finishes


Hurray, I am back in the saddle and keeping focused on a few finishes thanks to BitterSweet Designs!  I look forward to seeing what others accomplish toward their June goal at the end of the month.  
I hope to see your project there!


Craftsy


And for all you bargain shoppers, Craftsy is having a Summer Steals Sale this weekend on their fabric and kits.  I know I will be picking up some quilt backings, Kona solids and a few precuts at some really great prices.  Quilters do love a bargain!


Linking Up:


Thursday, October 17, 2013

Happy for a Finish!


Well,  I am happy to report I already have a finish on my 4th quarter Finish A-Long list with Leanne she can quilt!  It was a fairly easy finish as it only needed quilting but with my schedule right now, it is challenging to get even something small like this onto the quilting machine.


I kept the quilting really simple and just did horizontal quilting at irregular spacing.

This quilt was really the quilting equivalent of cleaning out the refrigerator.  All sorts of odds and ends went into this top.


Most of the fabrics were left over from this quilt.  I had made this little class sample for some raw edged applique I was teaching to my sewing group Project:Quilt.


Here is the quilt top we made in our sewing bee where I shared the technique.  Everyone brought scraps and a top was made in a few hours.


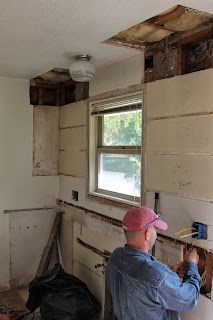
And here is the project that I wish I could say was finished.  This is currently the state of my kitchen. As my home was built in the 40's, deciding to change out the chipped up enamel sink turned into this.


It will be so nice to have a normal size refrigerator, taller counters and more cabinet space.

Or that is what I try and keep telling myself while I live with this mess.  Hopefully the cabinets will start going in next week and it will start looking like a kitchen again.


Now I am going back to my studio where it is a little quieter and a whole lot cleaner!  As everything that was in the kitchen is now piled here in my office, it looks like an episode of Extreme Hoaders in here.


Linking up with Needle and Thread Thursday at My Quilt Infatuation, Thursday Threads at The Bored Zombie, TGIFF at Quilt Matters, Finish It Up Friday at Crazy Mom Quilts and Can I get a Whoop Whoop!?.

01 09 10